
Step by Step Mold Mitigation Services Process in Bloomfield, New Jersey
When moisture enters a home in Bloomfield—through a roof leak, basement seepage, or a plumbing failure—mold can colonize quickly. An organized, step-by-step mold mitigation process is essential to protect occupants, preserve structural materials, and prevent new growth. Homeowners who understand the workflow can better prepare, ask informed questions, and set realistic expectations for timelines and outcomes. If you are at the beginning of this journey, reviewing what professional mold mitigation services include will help you navigate each stage with clarity.
Step 1: Intake and Pre-Assessment
The process starts with a conversation about your home’s history and current conditions. The team will ask about visible signs, odors, past water events, and high-humidity rooms. Sharing photos or videos can help prioritize the site visit. During pre-assessment, the goal is to gauge the scope and plan for safety, containment, and equipment.
What you can do: Make note of affected rooms, times when odors are strongest, and any events that preceded the problem (storms, appliance leaks, bathroom overflows). Clear pathways to the work areas so technicians can place equipment efficiently.
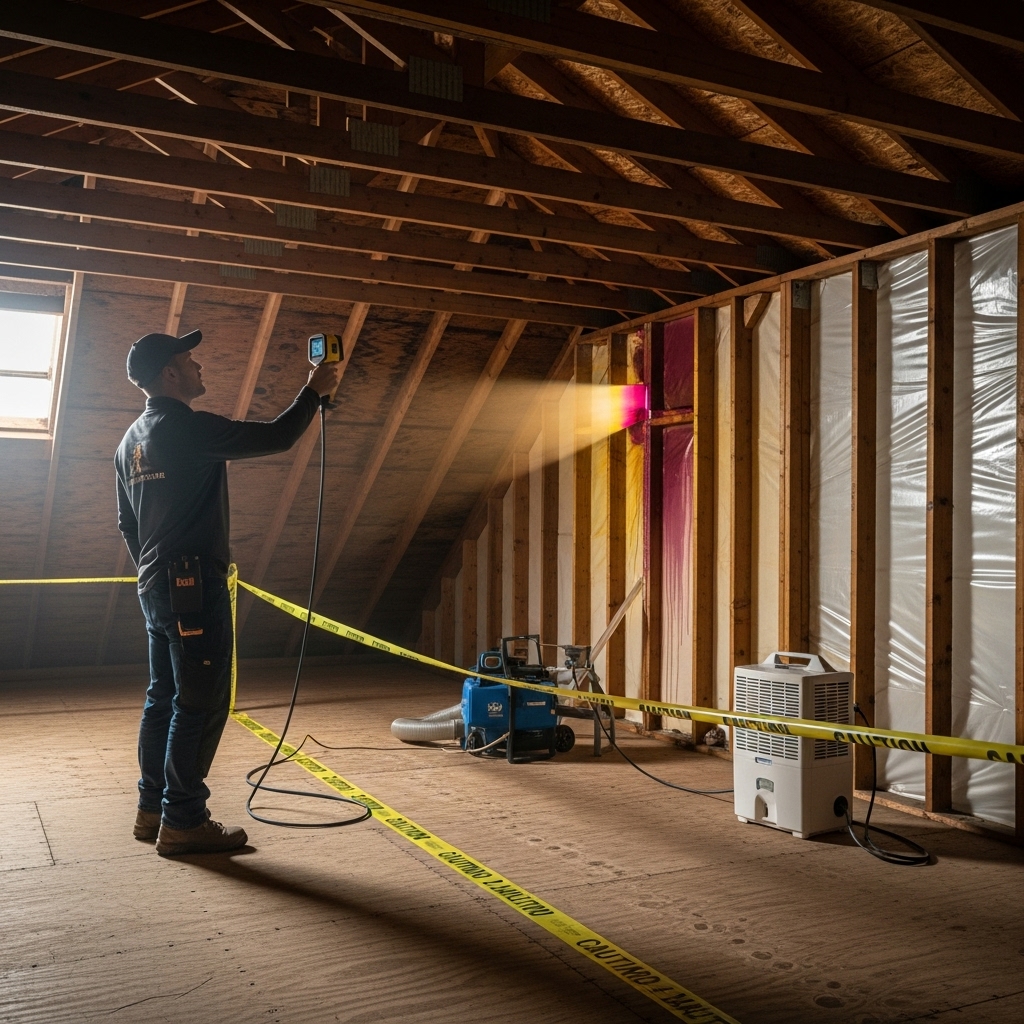
Step 2: On-Site Assessment and Moisture Mapping
At the property, technicians conduct a methodical inspection. They check walls, ceilings, flooring, and trim for discoloration, bubbling paint, or warping that could signal hidden moisture. Moisture meters and thermal imaging help identify damp pockets that are not obvious to the eye. In basements and attics—common trouble spots in Bloomfield—they also assess ventilation and insulation to see if condensation or insufficient airflow contributes to the issue.
Documentation is key. Expect photos, notes, and mapped readings. This record guides containment strategy and helps you understand what will be removed, cleaned, or protected.
Step 3: Safety Planning and Containment
Before any removal starts, containment controls are put in place. Plastic barriers isolate the work area, and negative air machines establish airflow from clean spaces into the contained zone, preventing spores from migrating. HEPA air scrubbers capture airborne particles during and after demolition. Doorways are sealed, and technicians wear protective gear while moving in and out of the containment to reduce cross-contamination.
Containment is not optional; it is the backbone of mitigation. It protects your family and keeps unimpacted rooms safe while work proceeds.
Step 4: Source Control and Drying Strategy
Addressing the moisture source prevents repeat growth. The team may recommend plumbing repairs, roof patching, improved grading, or ventilation upgrades. Dehumidifiers and air movers can be used to reduce ambient moisture while the work proceeds. In Bloomfield’s climate, controlling summer humidity and winter condensation is especially important, so the drying plan is tailored to the season and your home’s construction.
Step 5: Selective Removal of Contaminated Materials
Porous materials with substantial mold growth—such as certain drywall sections, insulation, and carpet—are typically removed and bagged within containment. Non-porous and semi-porous surfaces may be cleaned using appropriate methods. Technicians carefully dismantle affected finishes to avoid spreading spores, and they dispose of materials according to safety protocols.
Homeowners often worry about the scope of removal. The guiding principle is to remove materials that cannot be reliably cleaned and that would harbor residual contamination or odors. Your provider should explain why specific items are being removed and which can be restored.
Step 6: Cleaning, HEPA Vacuuming, and Surface Treatment
After removal, surfaces inside the containment are HEPA vacuumed to capture fine particles. Cleaning agents and methods are selected based on surface type. The goal is to remove residues thoroughly without damaging the substrate. Multiple passes of HEPA vacuuming and cleaning may be performed, followed by a drying period to ensure conditions are stable before rebuilding.
Step 7: Air Filtration and Particulate Reduction
HEPA air scrubbers run continuously throughout mitigation to capture airborne particles. Some projects also use negative air pressure to exhaust filtered air from the containment. Technicians monitor the equipment and adjust placement as needed for optimal airflow. This step is crucial for improving indoor air quality in the work area and preventing cross-contamination.
Step 8: Verification and Post-Work Inspection
Once cleaning is complete and moisture levels are appropriate, the team performs a final inspection. They verify that visible residues have been removed and that humidity and moisture readings are within acceptable ranges. If the project involves multiple rooms, they may proceed in phases, verifying each area before moving to the next.
Homeowners should expect clear documentation of the condition before and after work, as well as a summary of the corrective actions taken to control moisture.
Step 9: Rebuild Planning and Coordination
If walls, flooring, or trim were removed, a rebuild phase may follow. Some mitigation teams coordinate directly with carpenters, painters, or flooring installers; others can recommend trusted trades. Rebuilding should only begin after the area is clean, dry, and stable. Rushing this step risks sealing in moisture, which could trigger future growth.
Step 10: Prevention Guidance and Maintenance Tips
Mitigation is most successful when it ends with a plan to keep spaces dry. Expect practical, Bloomfield-specific advice: upgrading bathroom fans, running dehumidifiers in basements, sealing foundation cracks, improving attic ventilation, and maintaining gutters and downspouts. These steps reduce the risk of moisture returning to vulnerable areas.
What Makes a Strong Process in Bloomfield
Local experience matters. Homes in Bloomfield range from older colonials to newer builds, each with unique vulnerabilities. A strong provider understands how masonry foundations, mixed insulation, and regional weather patterns contribute to moisture. They tailor containment to your floor plan, anticipate high-traffic zones, and set up equipment to minimize disruption while maximizing effectiveness.
Preparing Your Home for Mitigation Day
While the team handles the technical work, you can streamline the process.
- Clear access to basements, attics, and utility rooms.
- Move fragile belongings away from work zones.
- Plan pet accommodations to avoid stress and exposure.
- Confirm parking and entry points for equipment and materials.
- Discuss noise expectations and daily schedules.
These small steps help the team move efficiently, shorten timelines, and keep your household running smoothly.
Mid-Project Check-Ins
Transparency is important during multi-day projects. Ask for daily updates on what was accomplished, what comes next, and any discoveries behind finishes. If the team finds additional moisture or damage, they should adjust the plan and explain the changes before proceeding. During this phase, revisiting what comprehensive mold mitigation services entail can help you stay oriented and confident in the next steps.
Frequently Asked Questions
Do I need to leave the home during mitigation? Not necessarily. With proper containment, many homeowners can remain, avoiding affected rooms. Your provider will advise based on the location and extent of work.
How long does the process take? Small areas may be addressed in a day; larger projects can span several days depending on removal, drying, and verification.
Will everything with mold be thrown away? Not always. Porous materials with heavy growth are typically removed, while non-porous surfaces can often be cleaned effectively.
What if new mold is discovered mid-project? The team should inform you immediately, adjust containment, and update the scope and timeline.
Can mitigation stop mold from ever returning? It dramatically reduces risk, but long-term success depends on controlling moisture. Prevention guidance is a critical final step.
Is testing required at the end? Some projects include post-work verification methods. Discuss options with your provider and decide what is appropriate for your home.
Aftercare: Keeping Your Home Dry and Healthy
Post-mitigation, keep humidity between 30% and 50%, use exhaust fans that vent outdoors, and monitor vulnerable areas after storms. Replace HVAC filters on schedule and consider periodic inspections if your home has a history of leaks. These habits make mitigation results last, preserving indoor air quality and preventing new growth.
Move Forward With Confidence
If you are ready to begin, schedule an assessment and prepare your home for a smooth, efficient project. To set expectations and plan each phase, review professional mold mitigation services and coordinate a visit so your Bloomfield property can be restored to a clean, dry, and healthy condition.