
Introduction: Why Mold Remediation Matters in Bloomfield, New Jersey
Bloomfield, New Jersey homeowners know that our four-season climate, older housing stock, and occasional basement moisture create a perfect setting for indoor mold. While small surface spots can sometimes be handled with simple cleaning, a full growth colony demands a structured approach. Understanding the mold remediation process helps you make informed decisions, protect your family’s health, and restore your home’s comfort quickly and safely. In the first days after discovering mold, it is natural to feel overwhelmed. The best antidote is clarity: know what happens next, what professionals will do, and how you can support the process from start to finish, beginning with a trusted plan for mold remediation.
This guide walks through each stage of mold remediation as it is commonly executed in Bloomfield homes, from investigation and moisture diagnostics to containment, removal, and prevention. You will learn the standards reputable companies follow, how to prepare your household, what to expect during work hours, how long it typically takes, and which post-remediation steps ensure lasting results. Because mold is ultimately a moisture problem, this article emphasizes the root-cause thinking needed to keep growth from returning.
How Mold Takes Hold in Bloomfield Homes
Mold spores are everywhere, but growth requires moisture and a food source, such as drywall paper, wood framing, carpet backing, or dust. In Bloomfield, common triggers include roof leaks after nor’easters, foundation seepage during heavy spring rains, clogged gutters overflowing into walls, and condensation from poorly insulated cold surfaces. Small plumbing leaks hidden behind cabinets or within finished basements can feed mold for weeks. High interior humidity—often from unvented bathrooms or underperforming dehumidifiers—can also sustain colonies on cooler surfaces.
Understanding the underlying moisture pattern shapes the remediation plan. A basement with hydrostatic pressure requires different prevention than a bathroom where the exhaust fan is undersized. The first step of any professional response is to map not just visible mold, but the moisture pathways feeding it, because removal without correction leads to rapid recurrence.
Phase 1: Assessment and Moisture Diagnostics
Experienced remediation teams start with a thorough inspection. They will walk the affected rooms, note discoloration, sniff for musty odors, and use moisture meters and thermal imaging to detect hidden dampness. They may ask about recent storms, appliance failures, or plumbing repairs to build a timeline. In some circumstances, especially in larger or sensitive projects, an independent indoor environmental professional (IEP) may conduct testing or write a scope of work. Whether or not testing is used, the essential goal is the same: quantify the affected areas, identify the moisture source, and define a safe plan.
Documentation begins here. Technicians will photograph conditions before any disturbance. This record not only supports quality control but helps homeowners understand the extent of the issue and the rationale for containment. When walls or ceilings are suspected of harboring mold behind finishes, professionals explain where limited openings or controlled demolition may be necessary to see and remove hidden growth.
Phase 2: Safety Planning and Containment Design
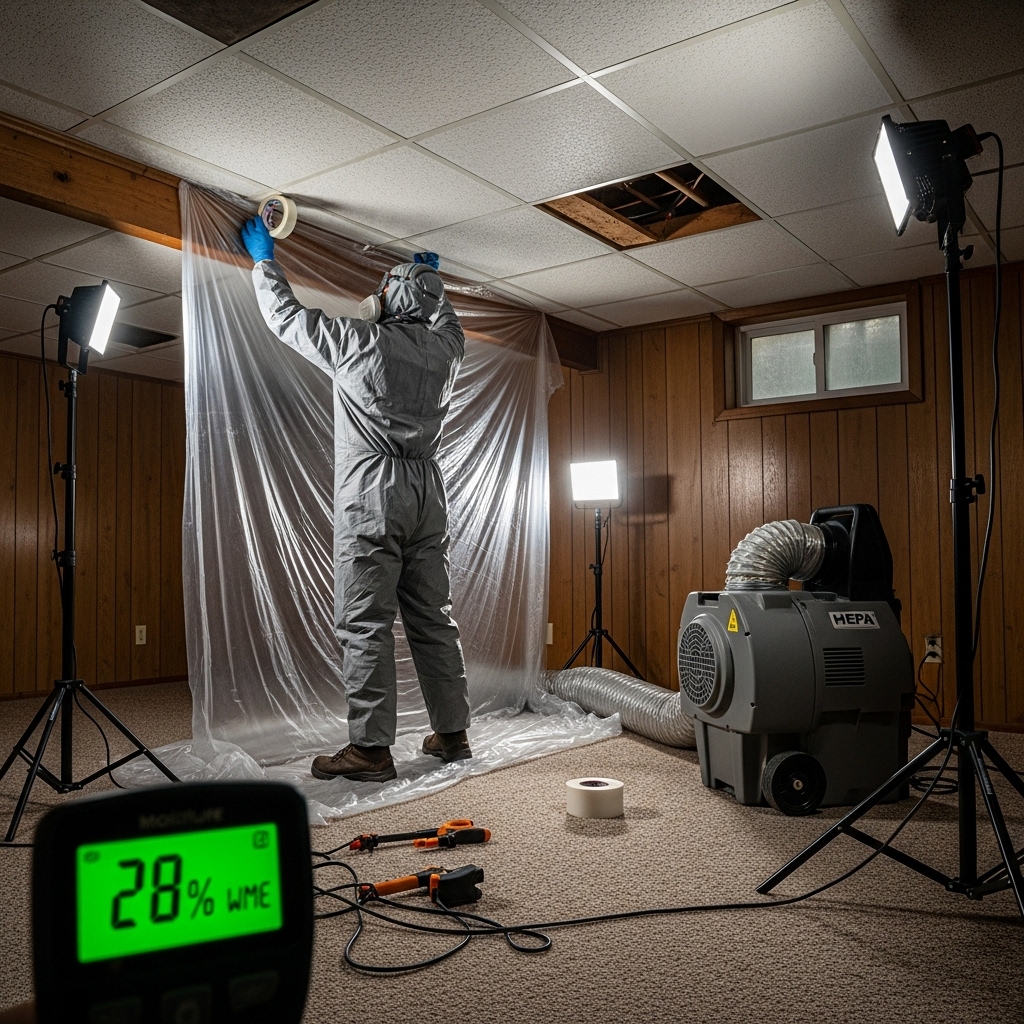
Mold remediation is about control. Containment is a temporary barrier system designed to prevent spores and dust from spreading during work. In Bloomfield’s frequently finished basements and compact hallways, technicians use poly sheeting and zipper doors to isolate the work area. Negative air machines with HEPA filtration are set up to exhaust air outside or through a safe pathway, maintaining directional airflow from clean to contaminated zones. Floors are protected with coverings, HVAC registers in the work area are sealed, and pressure differentials are verified.
Containment also includes personal protective equipment. Expect to see respirators, eye protection, gloves, and, depending on the scope, disposable suits. Clear signage marks the work zone boundaries, and technicians follow entry/exit protocols to keep surrounding rooms clean. A well-designed containment is one of the best indicators of a professional operation; it reflects respect for your home and for occupant health.
Phase 3: Controlled Removal of Contaminated Materials
Mold needs to be physically removed. Stained or colonized porous materials such as drywall, insulation, and some ceiling tiles typically must be discarded. Semi-porous or nonporous materials—framing lumber, subflooring, tile, metal, and certain plastics—can often be cleaned and decontaminated. The crew scores and cuts materials to limit dust, double-bags debris, and passes waste through decontamination chambers to avoid tracking contamination through living spaces. If cabinets or vanities have sustained water damage, they may be detached, inspected from behind, and either restored or removed.
In Bloomfield’s older homes, demolition sometimes uncovers surprises: an unsealed foundation crack, a deteriorated sill plate, or a long-forgotten plumbing repair. The team pauses to document these findings and to coordinate any additional trades—plumbers, roofers, or carpenters—so moisture sources can be closed before rebuild begins. Communication during this phase is critical because decisions about removal set the stage for lasting success.
Phase 4: HEPA Vacuuming, Detailed Cleaning, and Antimicrobial Application
With contaminated debris out, the work shifts to meticulous cleaning. Technicians use HEPA vacuums to capture fine particles from framing, subfloors, and hard surfaces. They wipe with detergent solutions and apply antimicrobial products where appropriate, following manufacturer instructions and safety data guidance. The goal is not to “kill” mold spores in place but to remove them from the built environment so that interior air returns to normal background levels.
Crews typically work top-down: rafters and joists first, then walls and base areas, and finally floors. They may repeat HEPA vacuuming and wiping cycles to reach cleanliness criteria, especially where exposed wood shows faint staining. Drying equipment such as dehumidifiers or air movers is used as needed to bring materials to acceptable moisture content, since cleaning is incomplete until surfaces are dry and stable.
Phase 5: Verification and, If Applicable, Third-Party Clearance
After cleaning and drying, the team conducts visual verification: surfaces must be free of dust, debris, and visible growth. In projects requiring third-party clearance, an IEP performs a visual check and may collect air or surface samples according to a defined protocol. Clearance criteria are typically based on normal indoor background comparisons and the absence of visible mold. If any area fails, the crew remobilizes for additional cleaning until standards are met.
Even when formal testing is not necessary, transparent verification builds confidence. Homeowners should expect a walkthrough, photographs of the finished workspace, and an explanation of moisture readings. This documentation becomes a valuable record for future buyers or insurance conversations, demonstrating that the issue was resolved properly.
Moisture Control: The Keystone of Prevention
No remediation is complete without moisture correction. Depending on the source, this may include gutter and downspout improvements, grading adjustments, sump system checks, foundation crack repairs, bathroom ventilation upgrades, or replacement of failed plumbing components. In basements, an appropriately sized dehumidifier—ideally with a drain line—keeps relative humidity in a healthy range. The professional team should discuss target humidity levels, how to monitor them, and signs that call for further evaluation.
Think of moisture control as insurance for your remediation investment. A clean, dry structure does not support mold growth. Pairing cleaning with source repairs yields durable results, whereas stopping at removal alone invites recurrence. Ask for a written moisture plan tailored to your Bloomfield home’s design, age, and use patterns.
What Homeowners Can Do Before Crews Arrive
Preparation helps the project run smoothly and protects your belongings. Remove small items from affected rooms, clear pathways to create safe access, and cover furniture in adjacent spaces if recommended by the contractor. Plan for limited use of the work area during remediation. If HVAC returns are within the containment zone, you may be asked to turn off the system to avoid distributing dust. Identify sensitive family members—infants, elderly adults, or those with respiratory conditions—and discuss whether temporary relocation from immediate work areas is advisable during high-activity phases.
- Secure pets away from the work zone to prevent stress and cross-contamination.
- Designate a communication contact so decisions can be made quickly.
- Ask about standard working hours, parking needs, and staging areas.
- Share any known history of leaks or prior repairs that could influence the scope.
Timeline: How Long Does Remediation Take?
Every project is unique, but most residential mold remediation jobs in Bloomfield fall within a window of a few days to a couple of weeks. Small bathroom projects with surface-limited mold can be completed in two to four days, including drying and cleanup. Larger basement or multi-room projects involving demolition may extend to one or two weeks, particularly if moisture repairs or third-party clearance are included. Rebuild—replacing drywall and finishes—adds additional time and is typically scheduled after clearance to avoid recontamination.
Remember that patience pays off. Rushing the drying phase or skipping an extra cleaning cycle risks leaving behind spores or moisture. A methodical pace ensures a safer final result and makes reconstruction more predictable.
When to Bring in Professionals
While homeowners can address very small, well-defined surface spots with proper protection and cleaning, professional help is recommended when the area of visible mold is significant, when growth is inside wall cavities, when symptoms suggest hidden moisture, or when vulnerable occupants are present. Skilled technicians bring containment tools, HEPA filtration, and specialized cleaning protocols that are difficult to replicate with household equipment. If you are unsure whether your situation requires outside help, request an assessment and discuss options for professional mold remediation that fits the conditions in your home.
Common Misconceptions That Complicate Remediation
Several myths can derail good decision-making. The first is the belief that bleach alone solves mold. While suitable for certain nonporous surfaces, bleach does not penetrate porous materials and can leave moisture behind. The second is assuming that painting over stained areas is sufficient; encapsulants are sometimes used after cleaning, but paint is not a substitute for removal. Third, people underestimate humidity. Even without a leak, a basement that cycles above 60 percent relative humidity in summer can support recurring growth. Finally, the idea that testing is always required is misleading. Testing is a tool, not a cure; a careful visual inspection and moisture mapping are often the best starting points.
Working Inside Older Bloomfield Structures
Many Bloomfield properties date to early- and mid-20th century construction, with plaster walls, hardwood framing, and layered renovations over time. Remediation in these homes benefits from an experienced eye. Plaster can hide moisture migration for long periods, wood lathe can host dust that feeds mold, and older mechanicals may lack modern ventilation. Professionals tailor containment to protect delicate finishes and plan waste pathways that avoid damaging trim or staircases. When insulation is discovered behind retrofitted drywall, technicians pay special attention to dew point control and air sealing to prevent future condensation.
How Occupants Experience the Work
Expect some noise from HEPA machines and the sound of cutting tools during demolition, limited to agreed working hours. Traffic in and out of the home is controlled and purposeful. Crews should be respectful, explain daily goals, and leave the home tidy outside of the containment each evening. You may notice a faint, clean scent from detergents or antimicrobial products; if you have sensitivities, mention them ahead of time so product choices can be discussed.
After Remediation: Rebuild and Long-Term Prevention
Once clearance is achieved, reconstruction can begin. This may involve reinstalling insulation with proper vapor control for the assembly, replacing drywall, priming and painting, and re-setting fixtures or cabinets. During rebuild, consider upgrades that improve durability: moisture-resistant drywall in bathrooms, backer boards behind tile, insulated rim joists, and correctly sized bath fans ducted outdoors. In basements, keep storage off the floor with shelves, leave a small gap between furniture and exterior walls, and use washable, low-pile rugs rather than carpet in moisture-prone zones.
- Monitor humidity with a reliable hygrometer, aiming for 30–50 percent year-round.
- Service gutters and downspouts seasonally, ensuring discharge away from the foundation.
- Inspect caulking, grout, and plumbing connections periodically for early leaks.
- Replace furnace filters regularly to support overall air quality.
Documentation You Should Receive
A professional remediation project concludes with a packet of records that may include before-and-after photos, moisture readings, equipment logs, disposal documentation, and, if applicable, clearance results. Keep these documents with your home records. They demonstrate that the work was done according to industry practice and can simplify future transactions or warranty questions. The more detailed the documentation, the easier it is to maintain continuity of care for your property.
Frequently Asked Questions
Q: Will mold come back after remediation? A: Not if the moisture source is addressed and humidity is managed. Remediation removes the current contamination; prevention practices keep conditions unfavorable for regrowth.
Q: Do I need to leave my home during remediation? A: Many homeowners remain in the house, staying out of the work zone. In larger projects, or when vulnerable individuals are present, temporary relocation from nearby rooms may be recommended during demolition and heavy cleaning.
Q: Is testing always required? A: Not always. Testing is useful in some cases, especially for large or complex projects or to provide third-party clearance. A thorough visual inspection and moisture diagnostics are the foundation for most residential jobs.
Q: How long does the process take? A: Small projects can wrap up in a few days; extensive, multi-room jobs may require one to two weeks, plus separate time for reconstruction after clearance.
Q: Can I paint over stained wood? A: Only after proper cleaning and drying, and sometimes after an encapsulant approved for post-remediation use. Paint alone should not be used to conceal growth.
Q: What about my HVAC system? A: Vents in the work zone are typically sealed during remediation. If growth is present in or near ductwork, additional HVAC cleaning may be discussed to restore air quality.
Q: Will insurance cover the work? A: Coverage varies by policy and cause. Document the issue promptly, keep records, and consult your insurer for guidance on eligibility and claim procedures.
Putting It All Together
The mold remediation process in Bloomfield, New Jersey follows a logical flow: assess, contain, remove, clean, dry, verify, and prevent. Each stage builds on the previous one to deliver a clean, healthy, and dry environment. For homeowners, the keys are early action, open communication, and careful attention to moisture control after the work concludes. By understanding how a reputable team operates, you can judge proposals confidently, prepare your home effectively, and maintain the gains achieved by the project.
Ready to Restore Your Bloomfield Home?
If you have discovered musty odors, discoloration, or damp finishes, take the next step with trusted mold remediation services that follow proven containment, cleaning, and moisture control practices. A clear plan, skilled technicians, and steady communication will carry your home from uncertainty to confidence—leaving you with a cleaner, safer, and drier living space for the seasons ahead.