
Introduction
If you are scheduling mold inspection and testing in Bloomfield, New Jersey, you are probably dealing with an odor, a past leak, or persistent dampness you cannot fully explain. Knowing what to expect reduces stress and helps you get the most value from the visit. This guide walks you through the process from preparation to final report, clarifying when sampling is useful and how results should be interpreted. Choosing a qualified professional for your mold inspection is the first step toward getting clear answers and actionable solutions.
Because Bloomfield homes often include finished basements, older roofing, and seasonal humidity, it is important to pick an inspector who understands local building patterns and moisture behavior. The right approach blends building science with environmental testing, ensuring that every sample and recommendation ties directly to what is happening inside your walls and under your floors.
How to Prepare Before the Inspector Arrives
Begin by collecting your observations. Note where you see staining, blistering paint, warped trim, or recurring condensation. Keep track of musty odors—when they appear and where they are strongest. Jot down the history of leaks, past water events, or roof issues, including approximate dates and how repairs were made. If you run a dehumidifier, note its typical range. Clear access to plumbing under sinks, the water heater, laundry area, basement perimeter, attic hatch, and around windows. Replace burned-out bulbs so darker areas can be seen. Pet owners may want to secure animals to prevent interruptions.
Have your questions ready. Do you want to understand why a particular room feels stuffy? Are you concerned about the safety of nursery or bedroom spaces? Do you suspect hidden moisture behind a wall? The inspection is a collaborative exercise—your observations and concerns help the inspector focus on the most relevant areas and decide whether testing is warranted.
The Walkthrough: Exterior to Interior
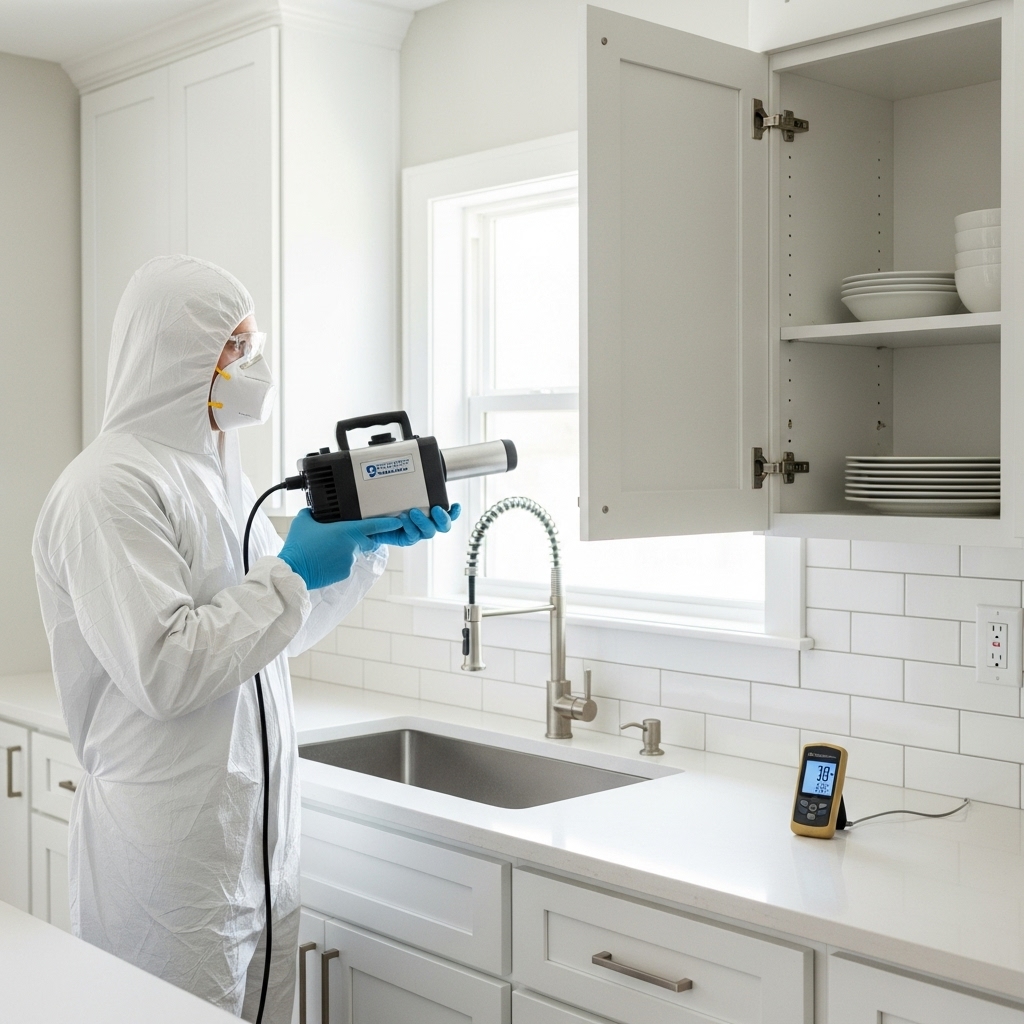
An effective inspection starts outside. The inspector will look at rooflines, gutters, downspouts, grading, and siding to understand how water is controlled. Indoors, the focus shifts to bathrooms, kitchens, laundry areas, basements or crawlspaces, and the attic. Expect the use of moisture meters to measure wetness inside materials, thermal imaging to visualize temperature differences that reveal hidden moisture, hygrometers to check humidity, and sometimes borescopes to look in limited fashion inside cavities. The inspector will balance thoroughness with respect for your home, avoiding unnecessary disturbance.
Communication throughout is key. Competent inspectors explain what they are measuring and why, pointing out building features that make moisture more likely to accumulate, such as unvented baths, blocked soffit vents, or carpet over concrete slabs in below-grade areas. They will connect the dots between conditions and symptoms, such as odors that correlate with humidity spikes or dust accumulation in the HVAC system.
When Testing Is Appropriate
Testing is not mandatory in every inspection. It becomes most valuable when there is a need to confirm hidden contamination, identify the type of growth on a surface, verify a successful remediation, or provide documentation for a real estate transaction. Air sampling captures airborne spores at specific locations and times; surface sampling (tape lifts or swabs) identifies what is present on a material; wall cavity air sampling can assess inaccessible spaces when indicated. Ethical inspectors choose sampling methods that answer a specific question, not to pad a report with numbers.
Chain-of-custody and independent laboratory analysis ensure credibility. Each sample’s location, time, and context should be documented. The number of samples should reflect the home’s size and the complexity of the concerns. Remember that any test is only a snapshot of conditions; interpretation must always be anchored in the building’s moisture dynamics.
Understanding Results in Context
Lab reports often list genera and spore counts or presence/absence for surfaces. What matters is how those results relate to the inspector’s observations. Elevated spores might reflect active moisture issues, recent disturbance of dust, or outdoor influences if windows were open. A taped surface sample may show growth on porous drywall paper that calls for removal, whereas a non-porous tile with light growth may be addressed with cleaning and humidity control. A strong report makes these distinctions and ties them to clear recommendations.
Expect your inspector to explain limitations: air samples are momentary, some species do not aerosolize readily, and different rooms have different normal backgrounds. The value comes from integrating data with moisture mapping and visual assessment, not from treating a single number as absolute proof.
Mid-Inspection Recap and Decision Points
Midway through, a quality provider will summarize what has been found so far and outline options for testing if needed. This is your chance to ask whether opening a wall is necessary, whether a suspected area can be monitored instead, or whether a ventilation adjustment may relieve a recurring problem. Clear discussion at this stage helps you avoid unnecessary work and ensures that any sampling serves a clear purpose. A professional who communicates well elevates the entire mold inspection experience.
What the Final Report Should Include
After the inspection and any testing, you should receive a written report with photographs, moisture readings, diagrams or thermal images as appropriate, and prioritized recommendations. The narrative should describe causes and effects, such as roof flashing defects causing attic sheathing discoloration or basement condensation from poor ventilation and absorbent finishes. The report should also explain what not to do, helping you avoid quick fixes that trap moisture or mask odors without addressing root causes.
Turnaround time varies depending on lab analysis, but the inspector should provide a clear expectation for delivery and availability for follow-up questions. A good report gives you a roadmap, not just a diagnosis.
What Happens if Remediation Is Needed
If the inspection reveals conditions that warrant removal of impacted materials, the report should outline principles of containment, dust control, and moisture correction. Key concepts include isolating the work area, using appropriate filtration, managing airflow to protect clean spaces, and verifying dryness before rebuilding. When the work is complete, a post-remediation verification inspection can confirm that the goals were met, giving you and your family peace of mind.
Preparing for Maximum Accuracy
If you are planning to test, avoid heavy cleaning or air-scrubbing right before the appointment, as this can skew results. Provide access to HVAC returns and supply vents, and avoid running fragrance diffusers that mask odors. If you can, document conditions during rain events and share those photos with the inspector. These steps make your inspection more efficient and your results more meaningful.
Special Focus Areas in Bloomfield Homes
Basements are a common focal point due to groundwater and vapor drive through concrete. Watch for efflorescence on masonry, rust on metal fixtures, and persistent dampness near perimeter walls. Bathrooms with weak exhaust or long duct runs can accumulate moisture at the ceiling and inside fan housings. Attics with inadequate air sealing at ceiling penetrations can develop sheathing discoloration from winter condensation. Understanding these patterns enables targeted recommendations and long-term prevention.
Safety and Occupant Considerations
Most inspections are non-destructive and safe to attend. If sensitive occupants are present, inspectors may recommend scheduling at a time when vulnerable individuals can be elsewhere, especially if sampling could disturb dust. Communication about pets, nursery rooms, or work-from-home schedules helps minimize disruption. A respectful process fosters trust and better outcomes.
Frequently Asked Questions
Q: How long does a typical inspection take? A: Duration depends on the property’s size and complexity and whether testing is performed. The emphasis should be on thoroughness rather than speed.
Q: Do I need to test even if I see visible mold? A: Not necessarily. When moisture sources and growth are obvious, the priority is correcting causes and safely removing affected materials. Testing is useful when conditions are unclear or when documentation is needed.
Q: Are DIY kits reliable? A: DIY kits can detect spores but provide limited context and often lead to confusion. Professional assessment ties data to moisture dynamics and building conditions, which is essential for meaningful action.
Q: Will a negative air machine be used during inspection? A: Inspections generally do not require such equipment. If remediation is later needed, containment and filtration strategies become relevant.
Q: Can I be present during sampling? A: Yes, and it can be helpful. Your insights about when odors appear or where leaks occurred guide smart sampling choices.
Q: What if results differ between rooms? A: Variations are expected. Interpretation should consider room function, ventilation, and proximity to moisture sources.
Q: How often should I re-inspect? A: After repairs or remediation, periodic checks make sense, especially after major weather events. Routine visual monitoring helps catch issues early.
Turning Insight into Action
The purpose of inspection and testing is not only to identify mold but also to understand why it appeared and how to prevent it from returning. With a clear, methodical process, you can make confident decisions about ventilation, repairs, and materials. The right provider equips you to maintain a drier, healthier environment for the long term.
Ready to Take the Next Step?
If you want a thorough evaluation that connects building science with clear reporting, schedule a professional mold inspection and move forward with confidence about what your home needs.