
A thorough mold odor inspection is part detective work, part building science. In Bloomfield, New Jersey—where summer humidity, Nor’easters, and aging housing stock intersect—the process must be systematic to reveal both sources and pathways of musty smells. This guide walks homeowners through a step-by-step inspection plan, tools you can use, and decision points for when to open walls or call in reinforcements. If you notice a persistent mold odor in a bathroom, basement, or near your HVAC, follow the steps below to pinpoint the cause and chart the most effective path forward.
The goal is simple: find moisture, confirm impacted materials, and choose the right remedy with the least disruption. By combining observation, measurement, and targeted testing, you can move from “it smells musty” to a clear, actionable plan.
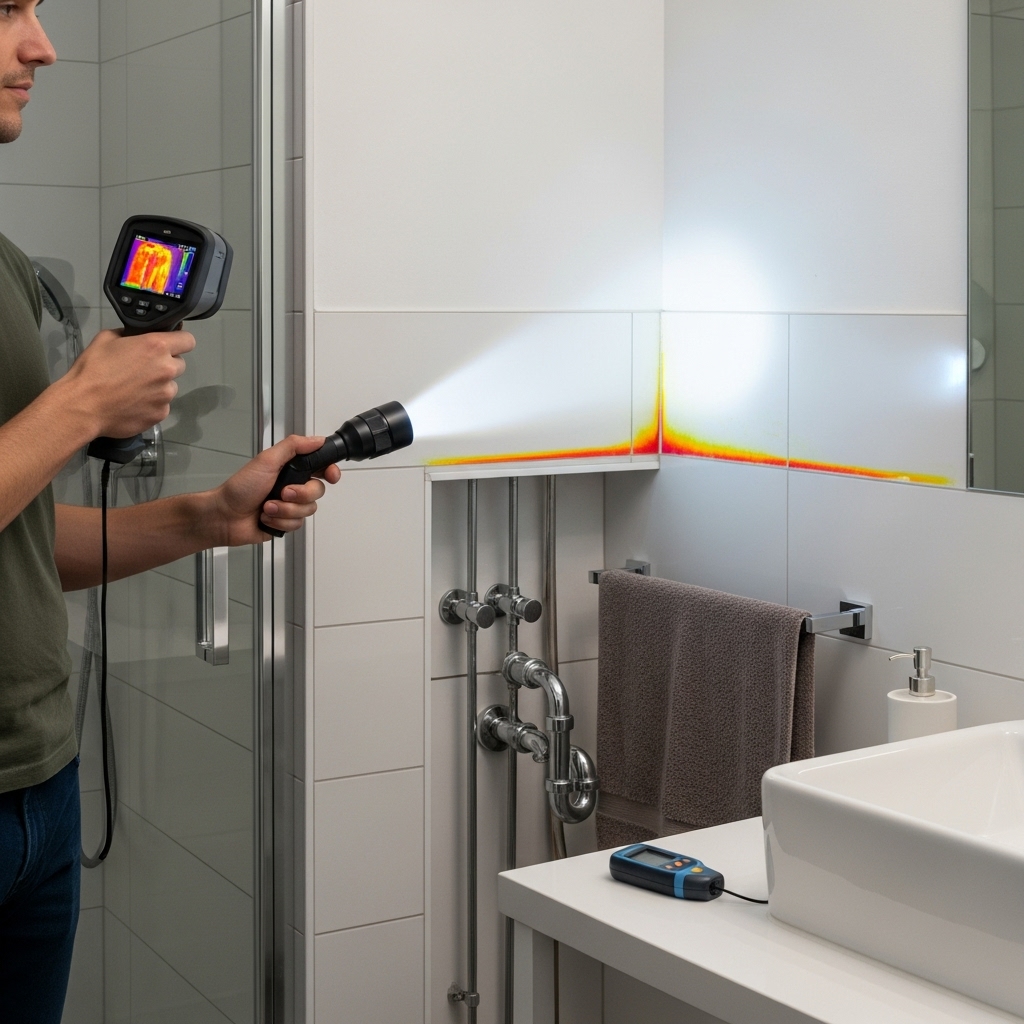
Inspection Tools and Setup
- Bright flashlight and inspection mirror
- Hygrometer for relative humidity
- Pinless and/or pin-style moisture meter
- Infrared thermometer or basic thermal camera (optional but helpful)
- Camera or smartphone for documentation
- Nitrile gloves and a respirator if opening materials
Exterior to Interior: The Right Sequence
- Start outside: Inspect roof lines, flashing, and gutters. Look for missing shingles and clogged downspouts.
- Foundation sweep: Check grading, downspout discharge, and any cracks that suggest water entry paths.
- Entry points: Examine window and door caulking; note any gaps or deteriorated seals.
- Move inside: Focus first on rooms with the strongest odor and track changes after rain or showers.
Room-by-Room Inspection Details
Bathrooms: Run the exhaust fan and verify it vents outdoors. Check grout and caulk lines for gaps. Probe the drywall near showers for softness and inspect under vanities for leaks.
Kitchens: Inspect under-sink cabinets for staining and swelling, and test dishwasher and refrigerator supply lines for drips. Confirm that range hoods vent outside, not into the attic.
Basements: Use a hygrometer to track humidity. Look for efflorescence on walls, damp corners, and odor pockets behind stored items or paneling. Consider floor drains, sump pits, and dehumidifier operation.
Attics: Verify intake (soffit) and exhaust (ridge or gable) ventilation. Scan for darkened sheathing near nails that can signal condensation. Check around roof penetrations.
Bedrooms and closets: Inspect exterior-wall closets for limited airflow and signs of condensation. Keep clothing off floors and allow space between furniture and walls.
HVAC System Checks
- Filter and coil condition: Dirty filters and coils can trap odors.
- Condensate drain: Ensure the pan is clean and the line is clear. Standing water is a common odor source.
- Ductwork: If the smell intensifies when the system runs, inspect return chases and nearby drywall for moisture history.
Moisture Mapping and Confirmation
When your nose says “the smell is here,” use a moisture meter to confirm. Scan baseboards, window corners, and plumbing penetrations. Pin meters can measure moisture content inside materials; pinless meters quickly screen larger areas. Elevated readings guide where to open walls or remove trim for a closer look. When possible, combine thermal imaging to spot temperature anomalies that suggest hidden moisture.
Deciding When to Open Materials
- Persistent odor with high moisture readings
- Visible staining, bubbling paint, or soft drywall
- Recurrent odors after surface cleaning
- Known leaks that affected porous materials
Start small: remove a baseboard, cut a small inspection hole, or lift a corner of flooring in the suspected area. Observe for discoloration, odor intensity, and damp insulation or framing. Document everything with photos.
Interpreting What You Find
If materials are damp or show visible colonization, focus on cause and effect. Fix the moisture source—leak, condensation, or intrusion—then remove affected porous materials. Clean and dry remaining surfaces thoroughly. In cases where no visible growth is present but odor persists, re-evaluate ventilation and look for adjacent sources such as a nearby mechanical closet or an upper unit in multi-family buildings.
Mid-Inspection Checkpoint
After you address obvious leaks and dry the area, reassess within 24–72 hours. Has the odor diminished? Are moisture readings dropping? If not, expand the search zone. You may be dealing with multiple contributing factors. When DIY efforts stall, a coordinated plan that includes targeted demolition, drying, and source removal is the fastest way to resolution. For complex or persistent scenarios, professional mold odor removal streamlines the process and helps prevent recurrence.
Bloomfield Considerations
- Older homes: Plaster over lathe can hide moisture for a long time; inspect around window headers and sills.
- Foundation types: Fieldstone or block foundations may allow seepage; monitor for seasonal changes.
- Snowmelt and spring rains: Plan pre-season checks for roof and gutter integrity.
Preventive Strategies After Inspection
- Humidity control: Keep indoor RH at 30–50% with dehumidifiers in basements.
- Exhaust upgrades: Install quiet, adequately sized fans to encourage regular use.
- Material choices: Use moisture-resistant drywall and appropriate flooring in damp-prone areas.
- Routine checks: Schedule semiannual walkthroughs focusing on bathrooms, kitchens, and basements.
- Storage habits: Elevate bins, avoid cardboard on concrete, and maintain airflow in closets.
FAQ
Q: I smell mustiness but can’t find moisture. What now?
A: Expand your search with a moisture meter and consider hidden areas like wall cavities near plumbing or behind shower surrounds. Reassess ventilation and humidity.
Q: Do I need lab testing?
A: Not usually. If there is clear evidence of moisture and impacted materials, focus resources on repairs and removal. Testing may be helpful in certain complex cases.
Q: Can I paint over the odor barrier primer?
A: Primers can help with residual odors on non-porous surfaces, but they don’t solve wet materials. Dry and remediate first.
Q: What PPE is appropriate for small openings?
A: Use gloves, eye protection, and a respirator. Contain dust and vacuum with HEPA filtration.
Q: Why does odor get worse when the HVAC turns on?
A: Airflow can pull smells from hidden cavities or push air across damp coils or pans. Inspect returns and condensate management.
Q: How quickly should I act after discovering a leak?
A: Begin drying within 24 hours. The faster you remove moisture, the less likely odors and growth become established.
Move from Odor to Action
A methodical inspection turns guesswork into a plan. Start outside, follow the moisture, confirm with meters, and open only where evidence points. If odors persist despite repairs, broaden your scope or bring in reinforcements.
Don’t let musty air define your home. For a thorough assessment and a clear remediation roadmap, schedule help from local Bloomfield specialists who can pinpoint issues and protect your indoor air quality. Connect today with trusted mold odor experts who can translate inspection findings into lasting results.