
When mold odor settles into a Bloomfield, New Jersey home, most people want to know two things: how long it will take to resolve and what factors influence the overall budget. While every property is unique, you can anticipate the general phases of an odor-removal project and understand the key drivers that affect both duration and spending. This guide explains typical sequences, preparation steps that shorten timelines, and ways to avoid rework. If you decide you would rather have a professional team manage the process, you can review reputable mold odor removal options as you plan so that expectations are clear from the start.
Before we discuss timing, it is essential to emphasize that odor removal succeeds only when the moisture source is addressed. Even the strongest cleaning routine will not produce a lasting result if leaks, high humidity, or groundwater intrusion continue. The smartest way to think about time and budget is this: the more accurately you locate and correct moisture issues at the beginning, the faster and more durable the deodorization outcome will be.
Homes in Bloomfield vary from older colonials with stone foundations to mid-century ranches and newer townhouses. These differences impact accessibility, ventilation, and how quickly spaces dry. A home with tight construction may trap humidity and require dedicated dehumidification, while a draftier house may air out faster but still need careful moisture management to stabilize. Factoring in local weather—especially hot, humid summers—can help you plan the most efficient approach.
The Phases of a Mold Odor Project
Whether you handle the issue yourself or bring in help, most odor-removal efforts follow several predictable stages. Understanding each one will help you estimate duration and organize tasks in a logical order.
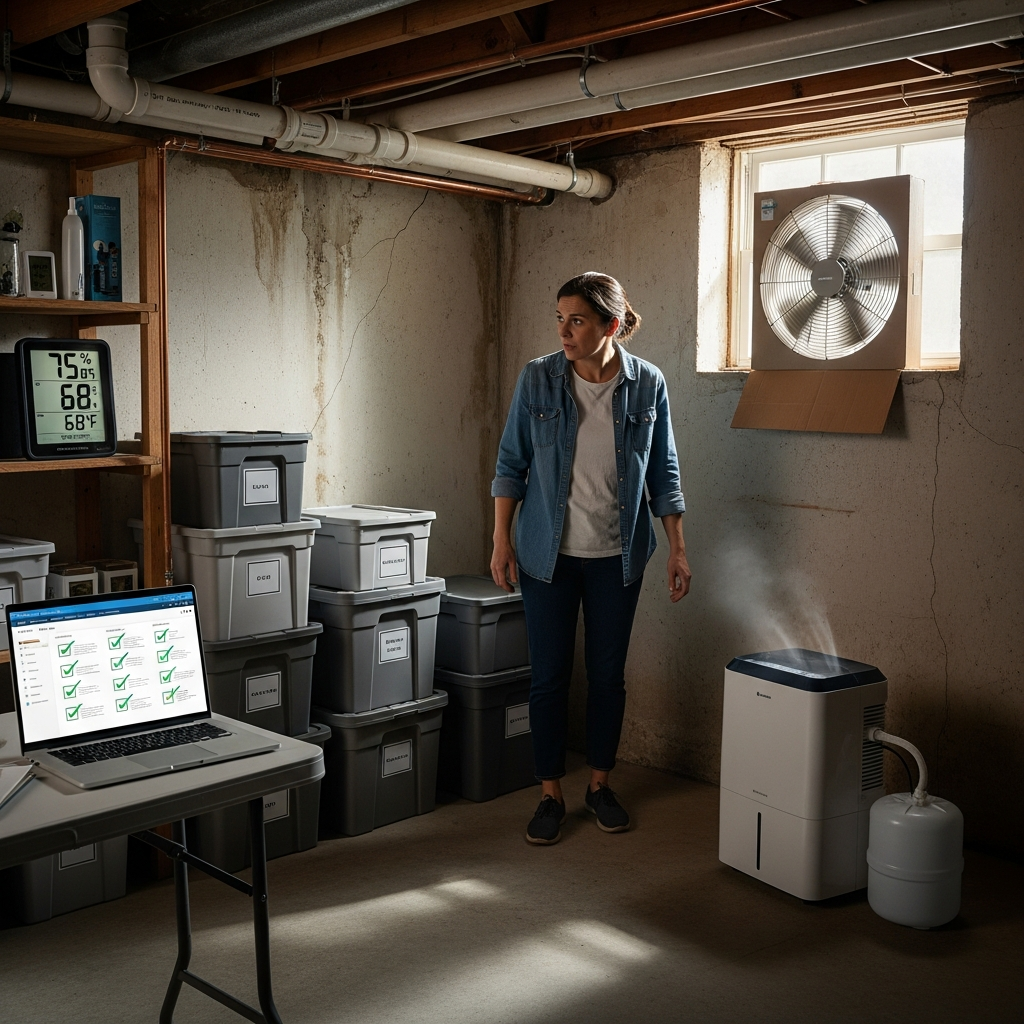
- Assessment and moisture mapping. You will trace the strongest odors, take humidity readings with a hygrometer, and look for leaks or damp areas. Time varies with home size and complexity. Thorough documentation now prevents guesswork later.
- Source control and stabilization. Repair plumbing leaks, improve exterior drainage, and start dehumidifiers. You will also open windows on dry days where appropriate and begin moving air with fans. This stage starts the clock on drying.
- Material triage. Sort and remove odor reservoirs, especially cardboard, damp textiles, and compromised carpet padding. Decide what to discard, what to launder, and what to clean on-site.
- Cleaning and deodorization. Wipe hard surfaces, scrub semi-porous materials, and deep-clean carpets or area rugs. Combine physical removal of residues with controlled drying to prevent re-odorizing.
- Reassessment and fine-tuning. After a day or two, smell again, measure humidity, and re-clean or open hidden areas if needed. This is also when you evaluate whether more intensive steps—like wall cavity inspection—are warranted.
- Prevention and maintenance. Once odors are under control, set humidity targets, adjust storage methods, and plan seasonal checks after rainstorms or snowmelt.
What Shapes the Timeline
Timelines depend on moisture severity, material types, and how quickly drying can be achieved. Here are the most important variables that lengthen or shorten the process:
- Moisture persistence. Active leaks or chronic seepage will extend drying time. Fixing moisture early compresses the schedule.
- Material porosity. Carpets, padding, and unsealed wood hold odors longer than tile or metal. The more porous the materials, the more cycles of cleaning and drying may be needed.
- Access and ventilation. Basements with limited airflow may need multiple days of steady dehumidification. Improved air circulation speeds the process significantly.
- Weather conditions. High outdoor humidity slows drying. Planning the bulk of work during a drier spell can shave days off the project.
- Scope and spread. A single bathroom or closet projects faster than a full basement. Odors that travel through HVAC may require additional system checks, extending the timeline.
How Preparation Saves Time
Preparation is the cheapest time-saver in any odor-removal plan. Clearing clutter from affected rooms improves airflow and exposes hidden odor reservoirs. Having cleaning supplies, brushes, bags for discarded items, and a working dehumidifier ready to go eliminates delays. Label storage bins and create a staging area for items that need laundering so you can move efficiently from assessment to action without stopping for logistics.
In Bloomfield, many timelines slow at the transition from cleaning to drying, especially in basements. Keep a hygrometer on-site and do not guess at moisture levels. When you measure progress, you will know when it is safe to reintroduce stored items and how to pace the next phase. Rushing to return belongings before humidity drops leads to re-odorizing and backtracking.
Budget Drivers Without Quoting Prices
While specific pricing varies by provider and scope, certain universal factors shape overall spending. You can use these to plan and prioritize without assigning exact numbers:
- Extent of moisture control. Repairs to stop leaks and manage groundwater have outsized impact on long-term success. Investing early here prevents repeated deodorization cycles.
- Quantity of porous materials. Wall-to-wall carpet, extensive drywall, and abundant soft furnishings increase labor and materials.
- Access constraints. Tight crawlspaces or complex layouts take more time to inspect and treat, influencing labor.
- Level of contamination. Light mustiness resolves faster than widespread odor tied to visible growth or HVAC involvement.
- Testing and documentation. Optional assessments, photos, and reports help with decision-making but add process steps.
Sample Timelines by Scenario
Every home is different, but thinking in scenarios helps with planning. A lightly affected bathroom with good exhaust may move from assessment to odor-free in a short window if humidity is corrected quickly. A cluttered basement with stored cardboard and carpeted stairs may require more days of sorting, deep-cleaning, and steady dehumidification to stabilize. If odors are tied to an HVAC condensate issue, additional time may be added for safe inspection, filter changes, and duct cleaning where indicated.
Do not be discouraged if your first 24 hours focus mostly on drying equipment and setup. That investment pays dividends by speeding all later steps. The goal is not just to neutralize smell, but to change the conditions that created it.
DIY or Professional: What Changes the Schedule
Homeowners can handle many odor issues effectively, particularly when the problem is localized and moisture is straightforward to fix. A professional crew adds capacity for large areas, hidden-source detection, and rapid drying with commercial equipment. This often shortens total duration, especially when there are multiple rooms or persistent basement humidity. If you choose to bring in help mid-project, a clear record of what you have already done—humidity readings, photos of suspect areas, and a list of cleaned materials—prevents duplication and accelerates results.
Mid-Project Course Corrections
It is common to notice that odors shift after the first round of cleaning. As surfaces dry, trapped smells can become more noticeable before they fade. Use this as a guide: if an area becomes the new hot spot, concentrate airflow and dehumidification there for another day or two. Rewash washable fabrics and reassess cardboard or paper storage. Midway checkpoints are a good time to consult local experts or review guidance from established resources on mold odor removal so you can confirm you are following an efficient sequence.
Preventing Timeline Creep
- Measure, do not guess. Keep the hygrometer visible in the work zone.
- Stay organized. Box items to discard, launder, or keep, and label them clearly.
- Avoid over-wetting. Use controlled amounts of cleaning solution and extract thoroughly.
- Ventilate strategically. Use fans and dehumidifiers continuously in damp spaces.
- Pause if scope grows. If you uncover a larger issue than expected, reassess the plan and call for help as needed.
Frequently Asked Questions
Q: How long does a typical basement take to deodorize? A: Basements vary widely. With proper drying and cleaning, many improve significantly over several days, but longer if humidity is stubborn or storage is extensive. The key is reaching and maintaining target humidity.
Q: What determines whether I need professional help? A: Consider bringing in help if odors persist after you fix moisture, if you suspect HVAC involvement, or if the area is large and difficult to access. Professionals can accelerate drying and locate hidden sources.
Q: Why do odors return after a week? A: This often means a moisture pathway remains or items like carpet padding or boxes continue to off-gas. Revisit humidity control and remove odor reservoirs.
Q: Can I set a firm deadline? A: You can plan phases and milestones, but flexibility is important because weather and drying rates affect outcomes. Focus on measurable targets like humidity below 50 percent rather than calendar dates alone.
Q: Will painting speed things up? A: Painting over damp materials traps moisture and can worsen odor later. Paint only after surfaces are dry and the smell is resolved.
Move Forward with Confidence
You can streamline your mold odor project by prioritizing moisture control, organizing materials, and pacing cleaning with measurable drying goals. If you want a straightforward path with fewer delays, reach out to a knowledgeable local team that understands Bloomfield’s climate and housing styles. For guidance, scheduling, or a second opinion, connect with experienced mold odor removal support and turn an uncertain timeline into a clear, step-by-step plan.