
Introduction: A Complete Guide to Mold Remediation for Bloomfield Homeowners
From spring rains that swell local streams to humid summer afternoons, Bloomfield, New Jersey offers a climate where moisture can persist indoors. When moisture lingers, mold can grow on drywall paper, framing, carpet backing, and dust, quietly spreading behind finishes or inside closets. This comprehensive guide explains how to handle mold practically and confidently—from early signs and first steps to professional methods, moisture control, and long-term prevention. If you have discovered growth or persistent musty odors and want a clear path forward, begin by orienting your plan around proven mold remediation practices that protect your family and your property.
What follows is a structured walkthrough of the entire process. You will learn what causes mold, how to evaluate severity, when to bring in professionals, how the work should be sequenced, and how to rebuild smart. By the end, you will be able to discuss scope, timelines, and prevention with confidence.
Understanding Mold: Causes and Conditions
Mold is a natural part of our environment, but it requires moisture and a food source to grow indoors. In Bloomfield homes, common sources include roof leaks after wind-driven rain, foundation seepage, overflowing gutters, condensation on cold surfaces, and hidden plumbing leaks. Even absent a discrete leak, high humidity is enough to sustain growth on dust-coated surfaces. Because spores are ubiquitous, the key to control is removing existing contamination and making your home inhospitable to new growth through moisture management.
Different materials respond differently. Porous items like drywall and insulation often cannot be cleaned once colonized and must be removed, while semi-porous and nonporous materials—wood framing, subfloors, tile, and metal—can usually be cleaned and restored. Understanding this distinction guides decisions and sets realistic expectations.
Early Warning Signs and First Steps
Musty odors, discoloration on walls or ceilings, peeling paint, and recurring condensation are early warning signs. If you see these, stabilize moisture right away: shut off leaks, ventilate the area, and start dehumidification where appropriate. Avoid tearing out materials or aggressive scrubbing before containment is established, as that can spread spores. Document what you see with photographs and notes about recent storms or water events to inform the assessment.
DIY vs. Professional: Making the Call
It is reasonable to handle very small, surface-limited spots on nonporous materials using appropriate protection and cleaning solutions. However, larger areas, hidden growth, multi-room involvement, or any situation with vulnerable occupants calls for a professional approach. Containment, HEPA filtration, and methodical cleaning are the hallmarks of a thorough job. If you are unsure which path fits your scenario, arrange an assessment and discuss professional mold remediation options suited to your home’s conditions.
The Professional Process, Step by Step
A well-executed remediation follows a clear sequence: assessment, containment, removal of contaminated materials, cleaning and HEPA vacuuming, drying, verification, and prevention. Skipping or abbreviating steps undermines results. Below is a deeper look at each stage so you know what to expect and which questions to ask.
Assessment and Moisture Diagnostics
Professionals begin with a visual inspection and moisture mapping. Meters and thermal imaging reveal dampness behind finishes, while odor patterns and surface readings help prioritize test openings. The assessor documents conditions with photos and notes likely moisture sources—roof flashing, gutter overflow, plumbing slow leaks, or ventilation gaps. In some cases, a third-party consultant writes a scope and handles clearance testing. Regardless of testing, defining the moisture source is non-negotiable; removal without correction is a temporary fix.
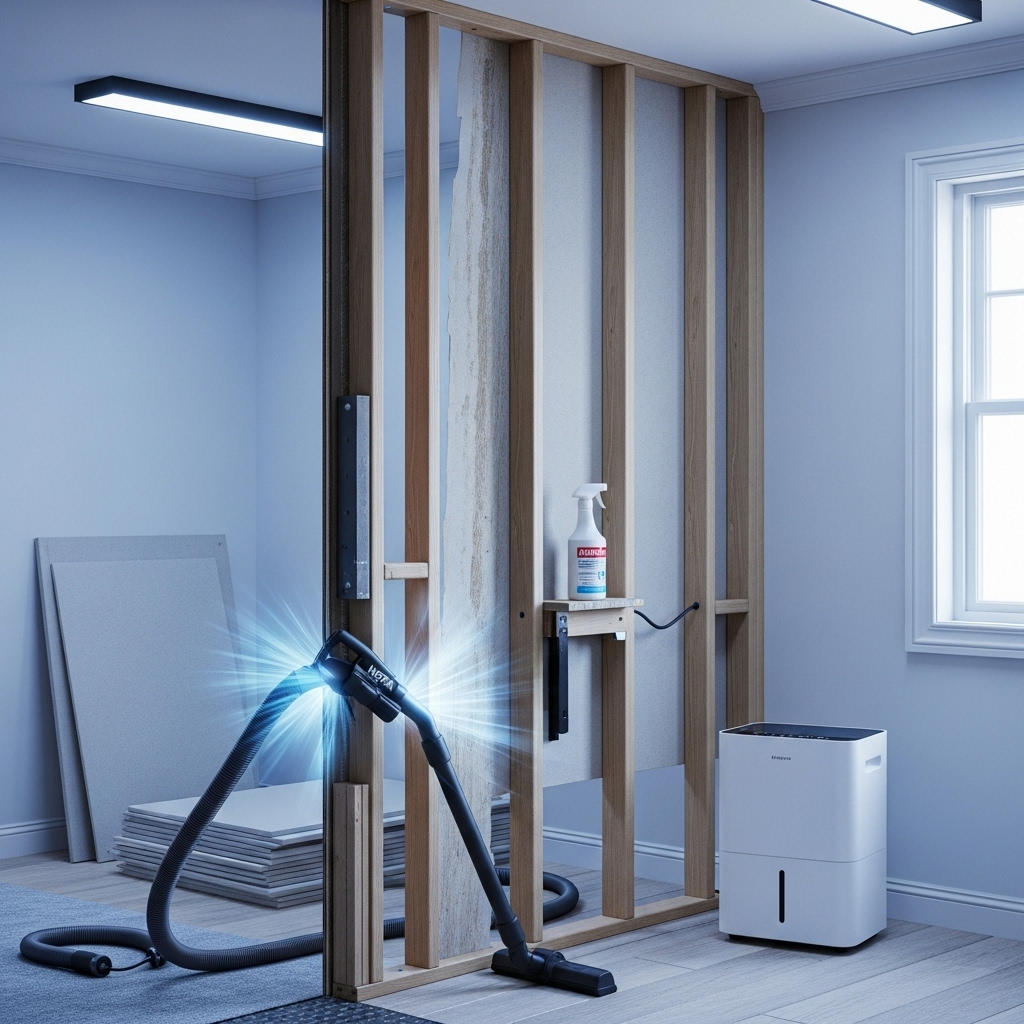
Containment and Safety Measures
Containment prevents cross-contamination. Poly sheeting encloses the work zone with zipper doors, and HEPA-filtered negative air machines pull air from clean spaces into the containment, out through safe exhaust paths. Registers are sealed, floors protected, and decontamination zones established for workers and waste. Personal protective equipment—respirators, gloves, and eye protection—supports safety. Containment must remain intact until cleaning and drying are verified.
Removal of Contaminated Materials
Porous materials supporting growth are removed and bagged. Technicians make controlled cuts along studs, capturing dust and limiting disturbance. Cabinetry may be detached to inspect behind, and baseboards or trim lifted to check for concealed contamination. Waste moves through the decontamination area to protect clean rooms. If unexpected moisture sources are uncovered, such as foundation seepage or a failed wax ring at a toilet, the plan pauses for repairs.
Cleaning and HEPA Vacuuming
With debris out, detailed cleaning begins. HEPA vacuums capture fine particles from framing, subfloors, and hard surfaces. Wiping with detergent solutions removes residues, and some projects include a second vacuuming after surfaces dry. Antimicrobial applications may be used in line with product directions. The guiding philosophy is removal, not just “killing” mold; leaving dead spores on surfaces does not meet cleanliness standards and can contribute to dust loads.
Drying to Targets
Drying locks in success. Dehumidifiers and air movers run until moisture readings hit target levels for wood and other materials. Humidity goals are set based on season, typically around 30–50 percent. Clearing moisture at rim joists, slab edges, and behind vapor barriers is critical to avoid future condensation. The project does not proceed to rebuild until dryness is confirmed and the source is addressed.
Verification and Clearance
A visual inspection ensures surfaces are free of dust and visible growth. For projects that include third-party clearance, an independent professional conducts visual checks and may take air or surface samples based on a defined protocol. If an area does not meet criteria, re-cleaning occurs before retesting. Homeowners receive documentation—photos, moisture logs, and, when applicable, clearance results—at closeout.
Rebuild with Durability in Mind
Reconstruction begins only after cleaning and drying are verified. In bathrooms, moisture-resistant drywall and properly ducted exhaust fans are smart upgrades. In basements, consider insulating rim joists, sealing air leaks, and using finishes that permit inspection and drying. Keep storage elevated and maintain some space between furniture and exterior walls to encourage airflow. These choices reduce risk and make any future maintenance simpler.
Moisture Control: The Long Game
Long-term success depends on controlling moisture. Improve drainage with clean gutters and properly extended downspouts, adjust grading if necessary, and repair foundation cracks. Indoors, maintain ventilation, size dehumidifiers correctly, and use exhaust fans during moisture-generating activities. A simple hygrometer helps you track conditions in real time so you can respond before problems escalate.
Homeowner Checklist
- Document initial conditions with photos and notes.
- Request a written scope and containment plan during assessment.
- Prepare the home by clearing pathways and protecting adjacent rooms.
- Verify that containment and HEPA filtration are in place before demolition.
- Confirm removal of contaminated porous materials and proper waste handling.
- Observe that HEPA vacuuming and detergent wiping occur in a top-down sequence.
- Review moisture readings and ensure the source is corrected.
- Request a final walkthrough and any clearance documentation.
- Plan rebuild with moisture-smart materials and ventilation upgrades.
- Establish a maintenance schedule for gutters, dehumidifiers, and exhaust fans.
Bloomfield Considerations: Climate and Housing Stock
Bloomfield’s mix of older homes and newer renovations creates unique challenges. Plaster-over-lathe walls can conceal moisture migration, while finished basements sometimes place framing directly against foundation walls, trapping humidity. Seasonal humidity makes basement dehumidification a must for many households. Work with professionals who understand these patterns and can tailor solutions to your home’s layout and history.
Frequently Asked Questions
Q: Do I need to leave my home during remediation? A: Often no. Many families remain in the home while staying out of the work zone. Sensitive individuals may benefit from temporary relocation during demolition and heavy cleaning.
Q: Is testing required for every project? A: Not always. Testing is helpful for complex jobs or when a third-party clearance is specified. Visual inspection and moisture diagnostics are the foundation of most residential projects.
Q: How long does remediation take? A: Small projects can be completed in a few days; larger, multi-room jobs may take one to two weeks, plus additional time for reconstruction after clearance.
Q: Can I paint over stained areas? A: Only after proper cleaning and drying. Paint is not a substitute for removal. In some cases, an approved encapsulant may be used after remediation on clean, dry surfaces.
Q: How do I prevent mold from coming back? A: Control moisture. Fix leaks promptly, manage humidity, maintain ventilation, and keep storage off the floor in basements.
Q: What happens if hidden mold is found during remodeling? A: Pause the project, establish containment, and reassess the scope. Adjust the plan to remove contamination and correct moisture sources before continuing.
Putting Knowledge into Action
Mold remediation is a disciplined process with a simple philosophy: remove contamination, dry the structure, and control moisture so it cannot return. By following the steps outlined in this guide, you can evaluate proposals, prepare your household, and maintain healthy indoor conditions through every season. When you want an experienced team to handle the details—from containment strategies to moisture diagnostics—choose proven mold remediation services that align with your home’s needs and schedule.