
The Mold Remediation Process for Bloomfield, New Jersey Homeowners
When mold shows up in a Bloomfield, New Jersey home, it is usually the visible sign of a moisture problem that has been building for days, weeks, or even seasons. Effective remediation is not a single task—it is a coordinated process that starts with moisture control and ends with verification that the space is clean, dry, and healthy. By understanding the sequence, homeowners can set realistic expectations, protect their families, and avoid rework. This guide explains each stage, from preparation to prevention, and highlights where professional support may make the difference between a quick fix and a lasting solution.
Beneath the surface, the process follows a consistent logic: assess conditions, stop the water, isolate the work, remove contamination, clean deeply, dry thoroughly, and confirm success. If the scope is large, the materials are delicate, or occupants are sensitive, partnering with certified specialists in mold remediation can ensure proper controls and documentation. But even if you choose a DIY approach for a small, well-defined area, the same principles apply.
Phase 1: Initial Assessment and Planning
Assessment begins with detective work. Identify when the problem started, where moisture is entering or accumulating, and how far growth may have spread. In Bloomfield, typical triggers include roof leaks after heavy rain, groundwater seepage into basements, poorly vented bathrooms, and condensation on cool surfaces during seasonal transitions. Use a moisture meter to compare suspect materials with known dry areas, and sketch a simple floor plan to map findings and plan containment. Decide which materials are likely salvageable and which will require disposal.
- Document visible growth, odors, and elevated moisture readings.
- Photograph conditions for your records and to guide work.
- List safety considerations, including potential lead paint or asbestos in older homes.
Phase 2: Source Control and Repairs
Before removal begins, the moisture source must be controlled. Repair roof flashing, regrade soil, extend downspouts, reseal plumbing, or adjust ventilation as needed. In basements, confirm dehumidifiers are sized correctly and drains or condensate lines are clear. If you skip this step, new growth can reappear quickly—even on freshly cleaned surfaces. Take the time to stabilize conditions, then proceed to containment.
Phase 3: Containment and Protection
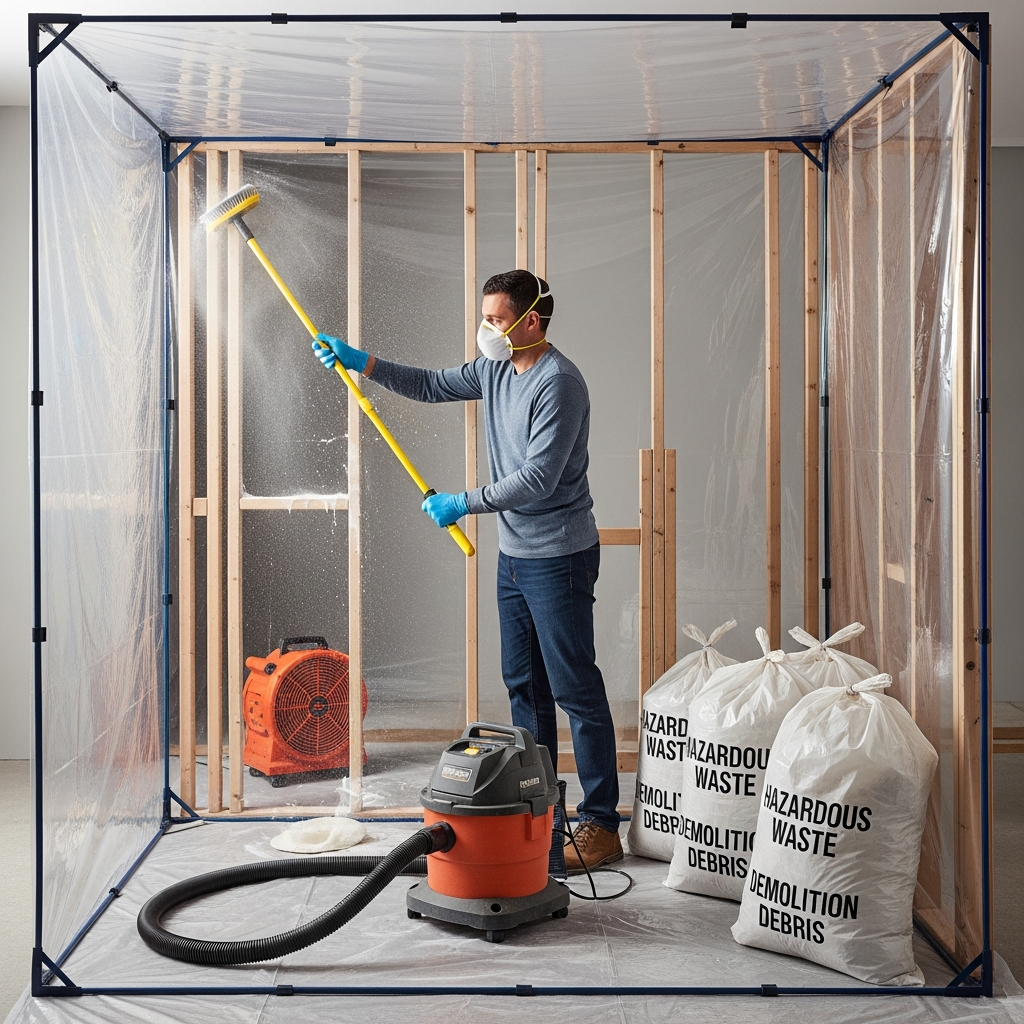
Containment prevents cross-contamination. Set up plastic barriers, seal HVAC vents, and create a single entry point with a zipper door. Lay down floor protection and sticky mats. For larger projects, use negative pressure within the containment and run a HEPA-filtered air scrubber. Establish a clean/dirty boundary where you don PPE before entering and remove it carefully when exiting. Post signs to keep family members out during active work.
- Turn off or isolate the central HVAC serving the work area.
- Bag supplies and tools for dedicated use inside containment.
- Plan a direct route from containment to exterior for debris disposal.
Phase 4: Selective Removal of Porous Materials
Remove materials that cannot be cleaned effectively. This often includes drywall with embedded growth, carpet padding, certain acoustic tiles, and heavily colonized insulation. Cut beyond visible staining to capture hidden damage. Mist lightly to suppress dust, and double-bag debris inside the containment. Keep demolition controlled—excessive tearing or grinding can spread particles and complicate cleanup.
Phase 5: Cleaning of Salvageable Surfaces
Once source materials are removed, begin cleaning. Start with HEPA vacuuming to capture loose spores and dust from studs, sheathing, and other surfaces. Follow with detergent-based damp wiping or gentle scrubbing, working top to bottom and from cleaner areas toward dirtier ones. For textured or semi-porous surfaces like framing, a combination of mechanical agitation and careful drying helps prepare them for final clearance. Avoid over-wetting; the goal is to remove contamination without adding moisture that prolongs dry-down.
- Use dedicated, labeled cloths and change them frequently.
- Rinse or replace brushes and pads to avoid re-depositing debris.
- Perform a second HEPA vacuum pass after wiping to capture remaining fines.
Phase 6: Drying and Environmental Stabilization
With debris removed and surfaces cleaned, focus on drying. Use dehumidifiers and, when appropriate, air movers to bring materials to normal moisture levels. Verify progress with a moisture meter, comparing affected areas to unaffected benchmarks. In Bloomfield’s humid summers, maintaining indoor relative humidity between 30% and 50% may require continuous dehumidification. Do not dismantle containment until surfaces reach targets; premature removal risks introducing fresh humidity and dust.
Phase 7: Verification and Quality Control
Verification confirms that remediation achieved its goals. Conduct a bright-light visual inspection, check horizontal surfaces for dust, and re-measure moisture. There should be no visible growth, no musty odors, and materials should be dry relative to baseline. Some homeowners choose third-party verification for additional assurance. Regardless, take final photos and update your documentation so there is a clear record of what was done and why.
Phase 8: Rebuilding and Finishes
Only when the area is clean and dry should you rebuild. Replace insulation where needed, install new drywall, and repaint with appropriate primers and finishes. Use caulks and sealants to reduce future air and moisture leaks. Where bathrooms or basements were affected, evaluate ventilation and choose moisture-tolerant materials to reduce the chance of future issues.
Roles and Responsibilities for Homeowners
Homeowners play a crucial role in preparation and prevention. Clear access to the work area, move or protect personal items, and establish a communication plan among family members to keep the project on schedule and safe. If hiring help, request a written scope with containment details, cleaning steps, drying targets, and verification criteria. Ask how debris will be managed and what documentation you will receive upon completion.
Common Pitfalls and How to Avoid Them
Several missteps can derail a remediation. Painting over growth without cleaning and drying invites recurrence. Running household fans during demolition spreads dust through the home. Skipping containment allows cross-contamination that lingers on carpets and furnishings. Failing to control humidity, especially in basements and during Bloomfield’s muggy months, can undo progress within days. Avoid these pitfalls by following the sequence strictly and building in time for each step.
Equipment Overview
Professional-grade equipment makes a difference. HEPA vacuums capture fine particles better than standard household units. Air scrubbers with true HEPA filters polish the air within containment. Calibrated moisture meters and thermo-hygrometers guide drying decisions. Dehumidifiers matched to room size and conditions maintain targets efficiently. If your project demands tools you do not own, consider renting or consulting a professional who performs mold remediation regularly and can provide equipment and expertise.
Special Considerations for Older Bloomfield Homes
Pre-war homes and mid-century properties can hide surprises: plaster-and-lath walls, unvented crawlspaces, lead-based paint, and asbestos-containing materials. Before any cutting or sanding, determine whether special testing or protocols are needed. Also consider that air leakage paths in older homes—like open chases or balloon framing—can move dust rapidly between floors. Extra care with containment and negative pressure helps keep cleaning efficient and protects living areas.
Post-Remediation Prevention
Remediation is complete only when the conditions that allowed growth are resolved. Maintain indoor humidity between 30% and 50%. Vent bathrooms for at least 20 to 30 minutes after showers. In basements, seal air leaks at rim joists and run a properly sized dehumidifier during humid months. Keep gutters clean, extend downspouts, and maintain positive grading so water moves away from the foundation. Replace HVAC filters regularly and schedule system maintenance to ensure condensate drains remain clear.
Frequently Asked Questions
Q: How long does the remediation process take? A: Small, well-contained projects may take a few days, while larger, multi-room jobs can require one to two weeks or more, including drying and verification. Timelines depend on scope, materials, and weather.
Q: Can I stay in my home during remediation? A: Often yes, if containment and airflow controls are set up properly and the work area is isolated. For central locations or very large projects, temporary relocation may be more comfortable.
Q: Do I always need to remove drywall? A: Not always. If growth is superficial and the source was brief, some surfaces can be cleaned. However, porous materials with embedded growth generally require removal to achieve lasting results.
Q: What relative humidity should I maintain after work is done? A: Keep indoor relative humidity between 30% and 50%. Use dehumidifiers in basements and lower levels during Bloomfield’s humid months.
Q: Is bleach the best cleaner? A: Bleach is not a universal solution and may be inappropriate for many surfaces. Mechanical removal, detergent cleaning, and HEPA vacuuming are the mainstays of effective remediation.
Q: How do I know if remediation worked? A: The area should be visibly clean, smell neutral, and measure dry compared to unaffected areas. Documentation and optional third-party verification add confidence.
Q: Will new paint peel if I do not wait for drying? A: Yes. Painting before materials reach dry targets can cause blistering, peeling, and recurring stains. Verify moisture before finishing work.
Q: What if I uncover lead paint or asbestos? A: Stop and arrange proper testing and protocols. Specialized handling is required for safety and compliance.
From Plan to Peace of Mind
By following a structured process—assessment, source control, containment, removal, cleaning, drying, and verification—you protect your home’s value and your family’s health. If you prefer expert oversight, choose a local provider experienced in mold remediation who can deliver a documented, step-by-step approach from start to finish.
Take the Next Step for a Healthier Home
Do not let uncertainty slow your restoration. Schedule a comprehensive plan with a trusted Bloomfield team that can assess, contain, clean, dry, and verify through proven mold remediation. With a clear process and expert guidance, you can return to a comfortable, healthy home sooner.