
Basements in Bloomfield, New Jersey face unique moisture challenges that make them especially vulnerable to fungal growth. Between heavy seasonal rains, dense clay soils that hold water, and older homes with porous foundations, spores can quickly find a foothold on cool concrete, framing, and stored belongings. If you notice earthy odors, discoloration on walls, or allergy-like symptoms that intensify when you head downstairs, it is time to learn how to address the issue methodically and safely. A clear, step-by-step approach ensures your family’s health, protects the structural components of your home, and reduces the chance of regrowth. If the situation is beyond light surface staining, many homeowners start by consulting reputable pros experienced in mold removal so the root moisture problem is identified and corrected alongside the cleanup.
Because basements are semi-below grade, the environment can fluctuate dramatically after storms, snowmelt, or even a plumbing drip behind a wall. Common sources include seepage through foundation cracks, condensation on cold water pipes, high interior humidity, and failures of sump pumps or dehumidifiers. Understanding the origin of dampness is the foundation of any successful plan. Without moisture control, even a thorough cleaning can be temporary. That is why a comprehensive strategy includes both remediation and prevention measures tailored to Bloomfield’s climate and housing stock.
How to Recognize Basement Mold Early
Early indicators often begin with your senses. A persistent musty odor, especially after a rainy week, is a classic warning. Visually, you might see speckled black, green, or white patches on drywall, wood sill plates, joists, or stored cardboard boxes. Efflorescence on concrete—white, powdery mineral deposits—signals water movement through the wall, which often travels with spores and organic dust. Another sign is condensation on appliances or masonry, pointing to elevated humidity. Health cues such as itchy eyes, sneezing, or aggravated asthma when you are in the basement can also be strong hints, though symptoms vary from person to person. Tracking where and when these red flags appear will guide your inspection and eventual scope of work.
Root Causes in Bloomfield Basements
In Bloomfield, hydrostatic pressure can push groundwater through tiny gaps in mortar joints and hairline cracks. Poor exterior grading that slopes toward the foundation channels rain toward the house. Clogged gutters and short downspouts dump water right at the footing. Inside, uninsulated pipes and cold concrete walls create dew points that trigger condensation in humid months. Laundry rooms and mechanical areas may add moisture through steam and combustion byproducts if ventilation is inadequate. Understanding whether your problem is seepage, condensation, or a plumbing leak helps determine the necessary blend of structural fixes and interior control.
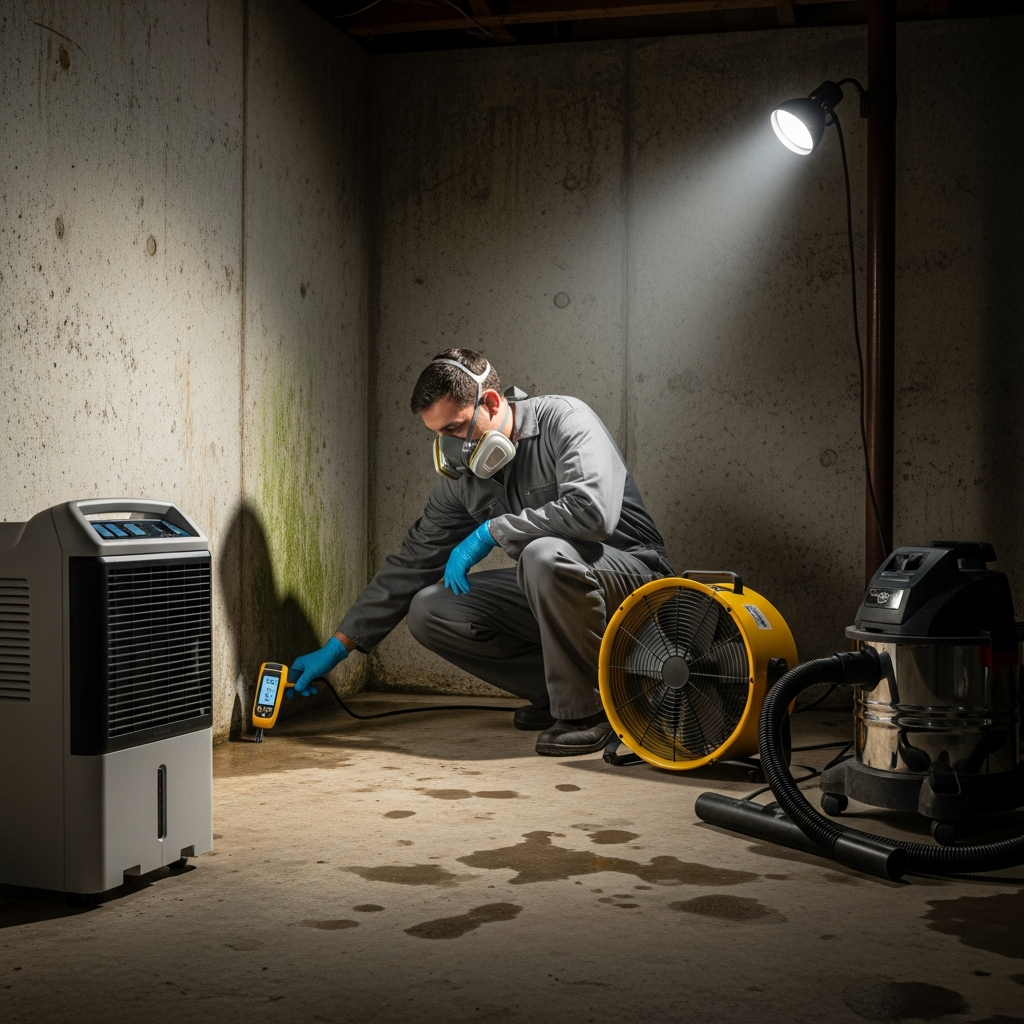
Safety First: Personal Protection and Containment
Before any cleanup, think safety. Protect lungs, eyes, and skin using an appropriate respirator, gloves, and eye protection. Even small jobs can release spores and fine dust. Set up basic containment if you are disturbing materials—this can be as simple as closing doors to limit airflow or as robust as temporary plastic barriers and negative air machines during larger projects. Turn off air circulation that could spread particles through the home, and cover supply and return vents in the work zone. Keep foot traffic to a minimum and plan a single path in and out so debris is not tracked upstairs.
Assessment: Mapping the Affected Areas
A deliberate assessment reduces surprises. Start with a moisture meter and note readings on drywall, base plates, and concrete. Use a bright flashlight to scan joist bays, subflooring under bathrooms or kitchens above, and around utility penetrations. Look behind stored items and along the tops of foundation walls where cool surfaces often show first signs. If staining is widespread, or if porous materials like drywall and insulation are saturated, larger-scale removal may be necessary. Photographs and notes help you or a professional formulate a targeted plan, estimate labor duration, and prioritize the most urgent risks.
Step-by-Step Basement Mold Removal
1) Stabilize moisture. Address active leaks, run a dehumidifier to bring relative humidity under control, and consider box fans to promote air movement while avoiding direct airflow over colonies that could aerosolize particles. 2) Isolate. Close doors and set up temporary barriers if needed. 3) Remove unsalvageable porous items such as water-logged drywall, carpet pads, and moldy cardboard. Cut drywall at least several inches above visible staining to capture hidden growth. 4) HEPA vacuum all surfaces—joists, studs, floors—to capture settled spores and dust. 5) Clean remaining hard, non-porous surfaces with a detergent solution and mechanical agitation; scrub concrete, metal, and sealed wood. 6) Dry thoroughly using dehumidification and air movement until moisture readings normalize. 7) Reinspect, then consider a protective coating on previously contaminated structural wood if recommended, ensuring it does not trap moisture. 8) Only after the area is dry and clean should you rebuild with moisture-smart materials and practices.
Basement Materials: What Can Be Saved?
Non-porous materials like metal shelving, sealed plastic bins, and finished concrete can often be cleaned and retained. Semi-porous items—framing lumber and subfloor—may be salvageable after thorough cleaning and drying if not structurally compromised. Highly porous materials, including insulation, carpet pad, particleboard furniture, and gypsum drywall, are usually discarded once they have visible growth or sustained wetting. Keep in mind that removing damp, contaminated items quickly reduces odor and helps the environment dry faster, minimizing secondary damage.
Moisture Control Strategies for Bloomfield Homes
Lasting success depends on preventing excess moisture. Begin outdoors: extend downspouts well away from the foundation and keep gutters clear. Adjust grading to slope gently away from the house. Repair cracks and penetrations with appropriate sealants and evaluate whether interior or exterior foundation waterproofing is warranted. Indoors, run a well-sized dehumidifier from spring through fall, especially during humid spells. Insulate cold water lines and consider insulating foundation walls where appropriate to limit condensation. Maintain your sump pump and test it regularly; in areas prone to intense storms, a battery backup can be a smart precaution. Vent clothes dryers outside and avoid line-drying laundry in the basement.
Halfway through the process, many homeowners realize that correcting the water source is as demanding as the cleanup itself. This is where experienced teams add value—comprehensive assessments, moisture mapping, and calibrated drying plans shorten the recovery timeline and reduce the risk of recurrent colonies. When you need deeper guidance, partnering with a crew skilled in professional mold removal can ensure that containment, cleaning, and preventive measures are aligned and verified before the space is put back into service.
Understanding “Cost” Without Numbers
While every project is unique, the drivers that influence overall investment are remarkably consistent. The size of the affected area and how deeply contamination has penetrated materials are major factors. Accessibility matters: open joists and exposed masonry are faster to treat than finished walls or tight crawl spaces. The type of water source—long-term seepage, high humidity, or a one-time plumbing failure—affects the level of contamination and the scope of removal. The complexity of containment and the need for air filtration and drying equipment influence duration. Finally, documentation requirements, such as pre- and post-remediation verification, can add steps but provide confidence that conditions have returned to normal.
Timeline and What to Expect
Small, localized issues can often be addressed within a few days from stabilization to final drying. Broader contamination, rebuild needs, or significant moisture corrections take longer. A typical sequence includes one to two days of moisture stabilization and selective removal, followed by detailed cleaning and drying that may extend several additional days. Rebuilding and finishing vary based on materials and schedules. Regardless of scope, a clear plan, daily monitoring, and transparent communication keep the process efficient and predictable.
Common Mistakes to Avoid
Painting over stained areas without proper cleaning and drying traps moisture and can cause peeling while leaving the problem active behind the finish. Running standard fans across visible growth can disperse particles instead of capturing them. Neglecting the source of water allows recolonization within weeks. Discarding too little—trying to save wet, porous materials—often leads to persistent odors and recurring staining. Finally, skipping verification, whether through moisture readings or a final visual inspection under bright light, can leave small pockets of residue that seed new growth.
Preparing the Space for Remediation
Before work begins, clear stored items to create access. Sort belongings into clean, questionable, and discard categories. Move furniture and boxes away from perimeter walls. Label any breaker switches that control basement circuits so equipment can be used safely. Establish a staging area near an exterior door for debris removal, and plan a disposal route that minimizes trips through finished parts of the home. If you have pets or sensitive individuals in the household, plan for temporary separation from the work zone to keep them comfortable.
Rebuild with Moisture-Smart Details
When the basement is dry and clean, take the opportunity to rebuild in a way that resists future moisture. Use insulation that tolerates incidental dampness, select mold-resistant drywall where finishing is desired, and frame walls with a small air gap from concrete to prevent wicking. Choose flooring that is appropriate for below-grade environments, and maintain dehumidification during humid months. If you use the basement for laundry or mechanicals, consider a simple humidity monitor to prompt ventilation or dehumidifier adjustments when levels rise.
Frequently Asked Questions
How do I know if I should attempt the cleanup myself? Small, surface-level growth on non-porous materials can often be handled by a homeowner who is comfortable with protective gear and methodical cleaning. However, widespread contamination, hidden moisture, or significant demolition typically benefits from trained professionals with proper equipment and containment.
Will dehumidifiers alone fix the problem? Dehumidification reduces condensation and keeps humidity in check, but it cannot correct active seepage or plumbing leaks. Effective solutions pair moisture control with source repair.
Do I have to remove finished walls? If staining is visible on drywall or insulation is wet, removing at least a margin above the damage is usually necessary. Behind finished walls, growth often extends beyond what you can see.
Is it safe to store items in the basement after cleaning? Yes, once the environment is dry and stable. Use sealed plastic bins instead of cardboard, elevate items off the floor on shelves, and maintain appropriate humidity to prevent future problems.
Can I just bleach the area and be done? Strong chemicals without proper cleaning and drying can mask discoloration but do not address the underlying issue. Mechanical removal of contamination, followed by thorough drying and prevention, is more reliable.
How long should drying take? Drying time varies with season, airflow, and material type. Monitoring with moisture meters ensures you rebuild only after materials return to acceptable levels.
Will my homeowners policy help? Coverage depends on the cause and policy language. Document conditions with photos and notes, address the source promptly, and consult your insurer for guidance.
Keeping Your Basement Healthy Year-Round
Make routine moisture checks part of your household maintenance. After heavy storms, walk the perimeter outdoors to ensure downspouts and grading are working. Indoors, inspect corners, mechanical rooms, and behind storage racks. Test the sump pump and examine window wells for standing water. Keep a simple log of humidity readings and any odor events; patterns over time can reveal vulnerabilities and inform future improvements.
Ready to Restore Your Basement in Bloomfield?
If your basement shows signs of contamination, acting sooner reduces disruption and protects your investment. A thoughtful plan—identify moisture, remove unsalvageable materials, clean meticulously, and prevent recurrence—delivers lasting results. For tailored guidance and careful execution, reach out to a trusted local team and schedule a consultation. Transform your lower level from damp and musty to dry and dependable. Connect with specialists who understand Bloomfield homes and can help you reclaim the space; schedule your mold removal visit and take the first step toward a healthier home today.