
Bloomfield, New Jersey’s mix of older housing stock and humid summers makes a thorough, repeatable plan essential when dealing with indoor mold. Whether you have noticed a faint musty smell in a basement room or discovered staining behind a bathroom vanity, having a clear checklist will help you act confidently, protect your family’s health, and preserve the value of your home. In this guide, you will find a practical, homeowner-friendly checklist built for Bloomfield’s climate and construction styles, including basements, crawl spaces, and brick or wood-frame homes. If you suspect a widespread issue or want an expert safety net, consider consulting professional mold removal help early so you can prevent small moisture problems from turning into recurring mold growth.
Use the sections below as a roadmap—from initial inspection and containment to removal, drying, sanitation, and long-term prevention. As you work through the list, remember that the goal is not just to remove visible mold, but to correct the conditions that allowed it to flourish in the first place.
Why Mold Appears in Bloomfield Homes
Mold spores are everywhere, but they only colonize and grow when three conditions align: moisture, organic material to feed on, and time. In Bloomfield, the moisture usually comes from one of four sources: heavy summer humidity, poorly vented bathrooms, basement seepage or foundation cracks, and roof or plumbing leaks. Organic food sources such as drywall paper, wood framing, carpeting, and dust provide the nutrients mold needs.
Homes with partially finished basements are especially susceptible. A small seep along a wall can dampen framing, carpeting, and trim, creating pockets of humidity inside voids. Bathrooms, laundry rooms, and kitchens also present risk due to frequent water use and steam. The checklist below is built to catch these scenarios before they escalate.
Health and Home Risks
Left unaddressed, mold can aggravate allergies, trigger respiratory irritation, and worsen asthma symptoms. While not every species poses the same level of concern, any active growth indicates elevated moisture and potential damage to building materials. Over time, mold may stain surfaces, cause unpleasant odors, and compromise finishes such as paint and caulk. The earlier you act, the easier it is to restore indoor air quality and prevent structural deterioration.
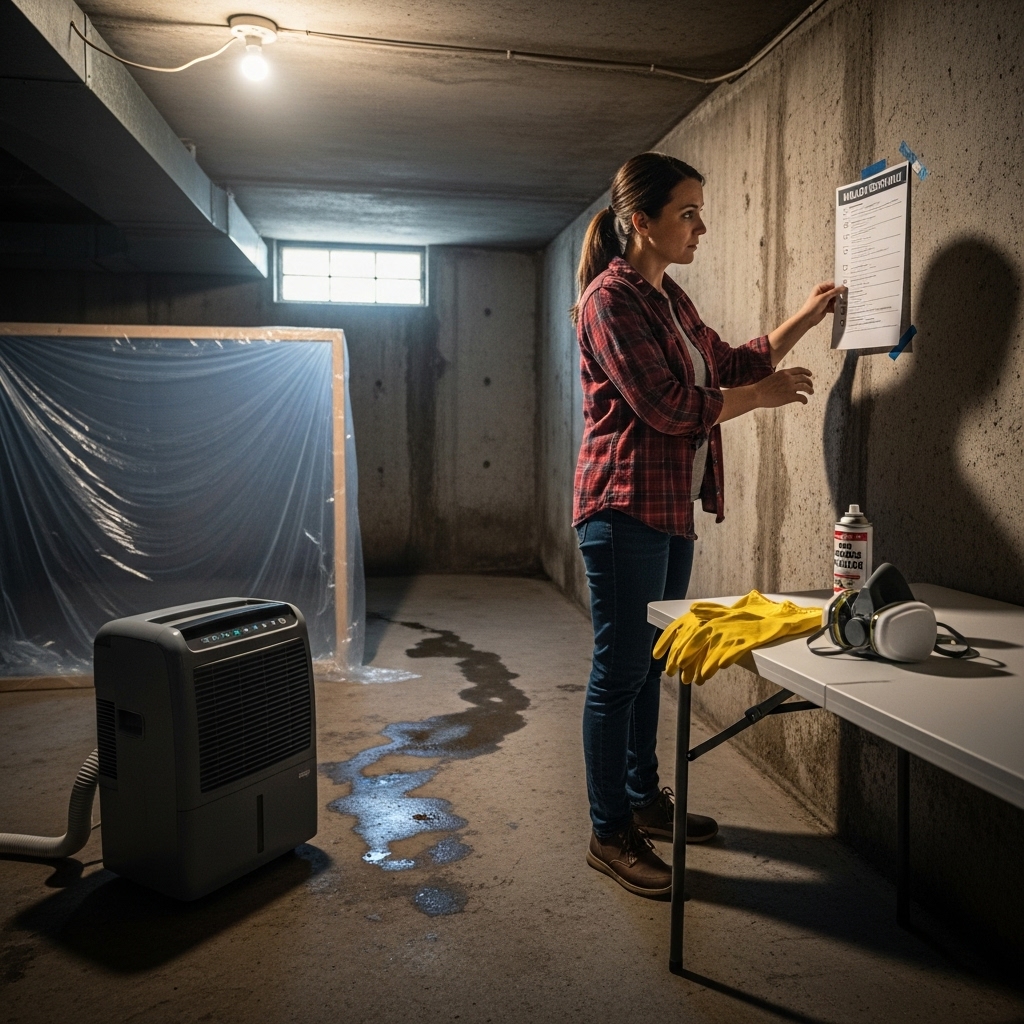
Bloomfield Mold Removal Checklist: Overview
- Document the problem and set safety boundaries.
- Identify and eliminate the moisture source.
- Plan containment and ventilation.
- Select personal protective equipment.
- Remove porous materials that cannot be effectively cleaned.
- Clean and treat hard, non-porous surfaces.
- Dry the area thoroughly and monitor humidity.
- Post-cleaning verification and odor check.
- Rebuild with moisture-smart materials and methods.
- Preventive maintenance and seasonal monitoring.
Step 1: Document and Set Safety Boundaries
Start by noting where you see visible growth, water stains, peeling paint, or detect musty odors. Take photos and jot down possible moisture sources. Next, establish a safety boundary. Keep children and pets away from affected rooms and close doors. If a larger area is involved, consider taping off the doorway with plastic sheeting to reduce particle migration. Always avoid aggressive brushing or demolition before you have a containment plan; disturbing a colony can send spores into surrounding spaces.
Step 2: Identify and Eliminate Moisture
Common moisture sources in Bloomfield include roof flashing leaks, unsealed window perimeters, foundation wall seepage, failed sump pumps, and slow plumbing leaks under sinks or behind walls. In bathrooms, check for cracked tile grout and ineffective ventilation. In basements, look for efflorescence on masonry, clogged gutters that dump water near the foundation, and grading that slopes toward the house. Fix first, remediate second. Without addressing the moisture, new growth will return even after thorough cleaning.
Moisture elimination may involve tasks like re-sealing penetrations, improving exterior drainage, repairing a toilet wax ring, or adding a properly sized dehumidifier. For any suspected hidden leak, shut off water to the fixture, observe your water meter for unexplained movement, and consider a professional inspection to avoid guesswork.
Step 3: Plan Containment and Ventilation
Containment keeps spores localized and protects clean areas of the home. Close doors, cover vents in the affected room, and install a temporary plastic barrier if you will be removing materials. For ventilation, aim to create negative pressure that exhausts air to the exterior. In small projects, opening a window and using a fan pointed outward can help. Avoid blowing air across the affected surface or into the rest of the house; that simply redistributes particles.
Step 4: Select Personal Protective Equipment
Use appropriate protection whenever you disturb contaminated materials. At minimum, wear gloves, eye protection, and a suitable respirator. Also consider disposable coveralls if you expect contact with dust and debris. Set up a simple doffing area near the exit so you do not transport spores to other spaces.
Step 5: Remove Porous Materials That Cannot Be Effectively Cleaned
Carpet, carpet pad, certain ceiling tiles, and deeply affected drywall are typically better removed and properly discarded. Cut drywall at least several inches beyond visible staining to reach clean material, and bag debris promptly. For insulation, remove any damp or musty sections. Wood framing that is surface-impacted can often be salvaged through cleaning and drying; however, crumbling, rotted, or persistently wet wood needs special attention and potential replacement.
Step 6: Clean and Treat Hard, Non-Porous Surfaces
Cleanable surfaces include tile, sealed concrete, metal, and certain finished woods. Begin with careful vacuuming using equipment fitted with fine filtration to capture dust. Follow with damp wiping using an appropriate cleaning solution. Change cloths frequently, work methodically, and avoid oversaturating surfaces. The objective is to remove residues—not simply to mask odors.
Step 7: Dry the Area Thoroughly and Monitor Humidity
Drying is the make-or-break step. Use dehumidification and airflow to achieve and maintain relative humidity in a comfortable range. Pay special attention to cavities behind walls, under cabinets, and within subfloors that can trap moisture. Keep air moving across damp surfaces until they reach a dry standard, then continue dehumidification to prevent rebound humidity, especially during Bloomfield’s muggy months.
Step 8: Post-Cleaning Verification and Odor Check
After removal and cleaning, give the area time to air out. Perform a visual inspection for any remaining staining and conduct a sniff test for musty odors. Surfaces should be clean and dry to the touch. If odors persist, revisit your moisture control strategy and inspect hidden cavities. Professional verification can be helpful for extensive projects; expert assessment, such as targeted testing or moisture mapping, can confirm that conditions have returned to normal.
Step 9: Rebuild with Moisture-Smart Materials and Methods
When reinstalling drywall or trim, consider mold-resistant products in moisture-prone rooms. In bathrooms, ensure proper backer boards behind tile, robust ventilation, and adequate caulking at seams. In basements, use raised subfloor systems or area rugs instead of wall-to-wall carpet. Seal concrete where appropriate and use vapor controls in compliance with building codes.
Step 10: Preventive Maintenance and Seasonal Monitoring
Prevention is the final pillar. Keep gutters clean, extend downspouts away from the foundation, and maintain a consistent indoor humidity range. Use bath and kitchen exhaust fans during and after water-generating activities. Inspect plumbing fixtures periodically and correct minor issues before they escalate. Seasonal attention pays off: Spring thaw and summer storms can challenge drainage; autumn leaf fall can clog gutters; winter freeze-thaw cycles can open small leaks that only show themselves come spring.
Bloomfield-Specific Tips
- Basements: Consider perimeter drainage improvements and quality dehumidification. Inspect window wells for pooling water.
- Bathrooms: Install timers on exhaust fans to keep them running after showers. Reseal grout and caulk as part of regular upkeep.
- Attics and Roofs: Check for roof ventilation issues, blocked soffits, or condensation on roof sheathing during cold snaps.
- Laundry Rooms: Use rigid ducting for dryers and clean lint routes. Verify that dryer vents exhaust outdoors and are not restricted.
- Entryways: Place washable mats and implement a shoe-free policy to reduce dirt and spores tracked indoors.
What to Avoid
- Do not paint over active mold. Paint is not a solution and may peel or discolor.
- Do not mix cleaning agents indiscriminately; combinations can be hazardous.
- Do not run fans that blow across contaminated areas into clean rooms.
- Do not ignore lingering odors. Smell is often the first sign that something remains damp.
When to Call a Professional
Consider expert help when you have extensive growth, recurring moisture you cannot pinpoint, health sensitivities, or complex building assemblies. Experienced teams can deploy moisture meters, thermal imaging, negative air containment, and specialized cleaning methods to address both the visible contamination and the hidden conditions behind it. If your schedule is tight or you want additional assurance, bringing in support mid-project can keep momentum strong.
In the middle of a project, many homeowners benefit from guidance on scope and sequencing. It is common to realize that a small patch of discolored drywall hides additional issues inside a wall bay. In such moments, professional mold removal services can help you refine the plan, protect adjacent spaces, and ensure the moisture pathway is fully resolved.
Maintenance Plan Checklist
- Monthly: Inspect under sinks and around toilets for leaks; run bath exhaust fans during showers and for additional minutes afterward.
- Quarterly: Clean gutters and check downspout extensions; inspect foundation for new cracks or signs of seepage.
- Seasonal: Adjust dehumidifier settings as outdoor conditions change; check caulk and weatherstripping.
- After Storms: Walk the property; confirm that grading moves water away and that basement walls show no new damp spots.
- Annually: Review your home’s ventilation performance; consider a whole-home humidity assessment.
Frequently Asked Questions
How quickly should I act after noticing mold? Promptly. The sooner you control moisture and begin safe removal, the easier it is to restore healthy indoor conditions.
Can I keep carpet if it has a musty smell? If the odor persists after thorough drying and cleaning, replacement is often the most reliable solution, especially in basements where moisture can recur.
Is it safe to work in a room with mold? Limit exposure. Use protective equipment and proper containment. If anyone in your household is sensitive to allergens or has respiratory issues, consider professional support.
Do I need to test the mold? Testing is not always necessary to fix the problem. The priority is correcting moisture and removing contamination. Testing can be useful in special cases or for peace of mind after remediation.
How do I know when the job is done? Surfaces should be clean, dry, and odor-free, with no visible growth. Humidity should be stable, and the moisture source controlled. If in doubt, seek an independent assessment.
Ready to Protect Your Bloomfield Home?
If you are staring at a stained baseboard, peeling paint near a bathroom ceiling, or suspicious spots across a basement wall, do not wait for the next humid week to make things worse. Create a plan, work the checklist, and close the loop with prevention. When you want experienced hands and specialized tools on your side, reach out for expert mold removal support so your home can stay dry, clean, and comfortable through every season in Bloomfield.