
Introduction: Why a Clear Mold Removal Process Matters in New Jersey
New Jersey’s mix of coastal humidity, four-season weather, and older housing stock creates a perfect storm for persistent indoor moisture. Basements, crawl spaces, bathrooms, and attics in the Garden State often face condensation, seepage, and occasional leaks that set the stage for mold growth. A structured, safe, and compliant approach is essential to protect property value, indoor air quality, and occupant health. This step-by-step guide walks you through preparation, containment, removal, and prevention so you can address fungal issues thoroughly rather than temporarily.
If you suspect a significant contamination or you are unsure where to begin, do not hesitate to consult experts. Early professional guidance can prevent mistakes that spread spores or hide the real source. For those moments when you need experienced help, consider trusted New Jersey specialists in mold removal to support you through testing, remediation, and long-term moisture control.
This resource is designed for homeowners, landlords, facility caretakers, and renovation professionals who want a practical plan tailored to New Jersey conditions. You will learn how to recognize red flags, prepare the area, remove affected materials safely, and reduce the likelihood of recurrence through targeted prevention strategies.
Understanding Mold in the New Jersey Context
Mold thrives where there is moisture, organic material, and poor air circulation. In New Jersey, common triggers include coastal storms that drive rain into building envelopes, freeze–thaw cycles that open cracks, and warm summer humidity that lingers in lower levels. Bathrooms without adequate ventilation and older basements without vapor barriers are frequent hotspots. Recognizing the signs—musty odors, visible spotting, peeling paint, warped flooring, or persistent allergy-like symptoms—helps you intervene early.
Not all mold situations are alike. Small, surface-level patches on non-porous materials may be addressed by diligent homeowners following safety precautions, whereas large or hidden growth behind walls, under flooring, or in HVAC systems merits professional remediation. When in doubt, consider the size of the affected area, the building’s history of leaks, and the sensitivity of occupants. Medical vulnerabilities demand a conservative, safety-first approach.
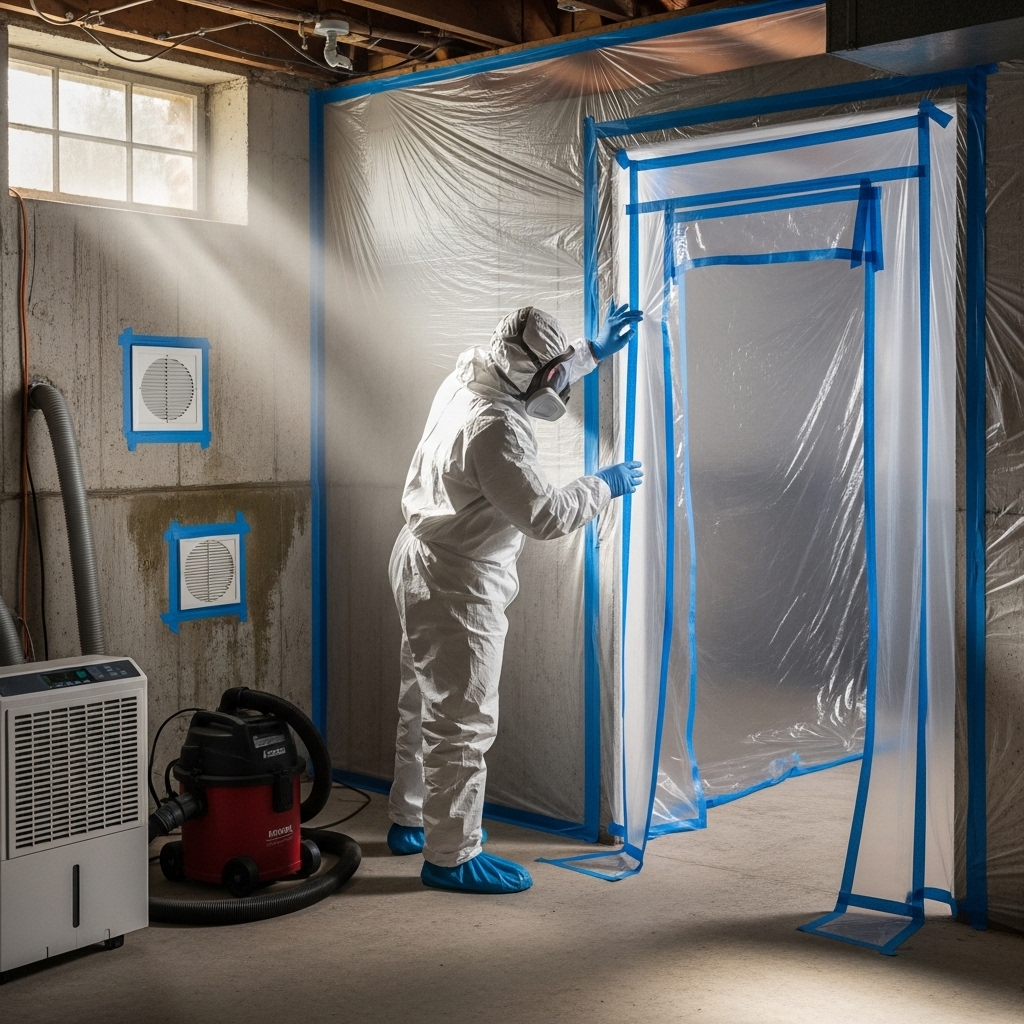
Safety First: Personal Protective Equipment and Site Readiness
Before you begin, put safety at the center of your plan. Wear appropriate personal protective equipment, including a properly fitted respirator rated for particulate filtration, gloves, and eye protection. Choose disposable coveralls or clothing you can launder immediately after the task. Shut down or isolate HVAC systems serving the affected area to reduce the risk of spreading spores throughout the home or building. Remove pets and ensure young children and immunocompromised individuals stay away from the work zone until the project is complete and cleared.
Create a basic remediation toolkit. Include plastic sheeting, tape for sealing, HEPA vacuum, contractor bags, non-ammonia cleaning agents, and dedicated sponges and wipes that you can dispose of after the job. Prepare your ventilation strategy: where possible, exhaust air to the outside through a window using a fan, and avoid pushing contaminated air into other rooms. Establish a staging area for tools and supplies to limit cross-contamination.
Containment and Moisture Control: The Foundation of Any Good Plan
Containment prevents spores from dispersing beyond the work zone. Start by isolating the affected area with plastic sheeting and tape at doorways, vents, and gaps. Create a primary entrance with a flap to minimize air movement. In multi-unit properties or buildings with shared hallways, be mindful of common areas and schedule work to reduce disturbance. If you are dealing with a larger or more complex project, negative air machines with HEPA filtration offer an added layer of protection, but even basic containment can make a noticeable difference when done carefully.
Once containment is in place, address moisture. Identify the source: a leaky pipe, roof intrusion, foundation seepage, condensation on cold surfaces, or high indoor humidity. Stop active leaks, dry standing water, and run dehumidifiers to bring relative humidity below 50%. Without moisture control, even the most thorough cleanup may fail because spores can quickly recolonize damp materials.
Step-by-Step Mold Removal Process
- Assessment and mapping: Document visible growth, staining, and water damage. Note materials involved—drywall, insulation, wood framing, tile grout, or furniture—and consider whether they are porous or non-porous. Photographing the scene helps track progress and supports insurance or disclosure requirements.
- Establish safety and containment: Don PPE, seal the area, and shut off or isolate HVAC zones feeding the affected rooms. Place sticky mats or damp towels at the exit to capture debris from footwear.
- Initial cleanup and HEPA vacuuming: Use a HEPA vacuum to remove loose debris and settled dust from surfaces before wet cleaning. This step reduces the load of spores and fragments that might become airborne during wiping or demolition.
- Selective removal of porous materials: If drywall, ceiling tiles, carpet pad, or insulation are saturated, stained, or structurally compromised, cut out and bag these items. Make clean, controlled cuts to limit disturbance, and immediately place materials in sealed contractor bags.
- Cleaning of non-porous and semi-porous surfaces: On materials such as tile, sealed wood, metal, and certain plastics, apply a suitable cleaning solution and wipe thoroughly. Use multiple passes with fresh cloths to avoid smearing contamination.
- Detail work: Pay special attention to corners, baseboards, window sills, and the undersides of shelving. These areas trap dust and micro-particles where colonies can reestablish. Use a light to inspect surfaces from different angles.
- Drying and dehumidification: After cleaning, accelerate drying with air movement and dehumidification. Keep relative humidity under control for several days to discourage regrowth. Monitor with a hygrometer if possible.
- Post-cleaning HEPA vacuuming: Once surfaces are dry, vacuum again to capture any settled particles. Replace filters as recommended by the manufacturer to maintain performance.
- Odor check and visual clearance: A fresh, neutral smell and a clean visual assessment are encouraging signs. Persistent musty odors may indicate hidden moisture or material that needs additional attention.
- Rebuild and seal: When the area is fully dry and clean, replace removed drywall or insulation. Consider using moisture-resistant products in bathrooms and basements, and apply appropriate sealants at seams and penetrations to reduce future moisture intrusion.
Special Considerations for New Jersey Homes and Buildings
Basements along the Delaware and Raritan valleys often battle hydrostatic pressure and elevated groundwater during heavy rain events. Install or maintain sump pumps, check French drains, and seal foundation cracks to reduce seepage. Along the shore, wind-driven rain and salt-laden air can strain exterior finishes; regular inspections of flashing, siding, and attic ventilation reduce wetting events that feed mold. In older urban housing, tightly sealed windows without adequate mechanical ventilation can trap humidity; balanced ventilation and bathroom exhaust fans timed to run after showers help normalize moisture.
In multifamily and commercial properties, coordinate with building management to ensure consistent standards. Shared systems and neighboring units can complicate airflow and moisture dynamics. A collaborative approach reduces surprises during remediation and helps prevent recurring problems caused by sources outside the immediate space.
When to Call Professionals
There are practical thresholds where expert intervention is wise. If the affected area is large, if contamination involves HVAC systems, or if you cannot identify the moisture source, professional support can save time and reduce risk. Occupants with respiratory conditions, infants, or older adults should prompt a conservative decision. Mid-project surprises—like discovering hidden growth behind tile or extensive damage under flooring—are common triggers to bring in help. When you are ready to consult, lean on reputable New Jersey providers who specialize in diagnostics, containment, and safe demolition. If you need a partner midway or for full-service assistance, you can seek out seasoned teams experienced in mold removal who understand local buildings and weather patterns.
Prevention: Keep Mold from Coming Back
- Control humidity: Keep indoor levels between 30% and 50%, especially during summer. Use dehumidifiers in basements and seal air leaks that pull in humid outdoor air.
- Ventilate: Ensure bathroom and kitchen fans exhaust outdoors, not into attics or crawl spaces. Run fans long enough after activities that generate humidity.
- Fix leaks quickly: Catch roof, plumbing, and window leaks early. Small drips become long-term wetting that nourishes growth.
- Improve drainage: Clean gutters, extend downspouts, and grade soil to move water away from foundations. Check that sump systems operate correctly before storm season.
- Choose materials wisely: In areas prone to dampness, use moisture-resistant drywall, mold-resistant paint, and hard-surface flooring that tolerates occasional wetting.
- Maintain HVAC: Replace filters on schedule and keep condensate lines clear. Inspect evaporator coils and drip pans for cleanliness and proper drainage.
Common Mistakes to Avoid
- Skipping containment: Even small projects can spread spores without barriers and careful movement.
- Using the wrong cleaners: Avoid mixing chemicals and be mindful of surface compatibility. The goal is thorough removal, not just odor masking.
- Rushing drying: Rebuilding before materials are fully dry traps moisture and invites recurrence.
- Ignoring hidden moisture: If odors persist or humidity remains high, revisit the root cause rather than adding fragrances or paint.
- Neglecting follow-up: Periodic inspections after remediation catch early signs of return and keep the space healthy.
FAQ
Q: How do I know if mold is active or just staining? A: Active growth typically appears fuzzy or velvety and may spread over time, especially in damp conditions. Stains can remain after colonies are removed; focus on moisture control and cleanliness to prevent active regrowth.
Q: Is bleach the best solution for all surfaces? A: Not necessarily. Bleach can be harsh, may not penetrate porous materials, and may create fumes. Select cleaners suitable for the surface and follow safety directions. Physical removal and drying are paramount.
Q: Should I test for mold before starting? A: Testing can be helpful for complex cases, occupant health concerns, or legal documentation. For small, obvious moisture issues, direct remediation and moisture management might be more efficient.
Q: Can I paint over mold to seal it in? A: Paint does not solve contamination or moisture problems. Clean thoroughly, dry completely, and only then use appropriate coatings in areas where moisture is controlled.
Q: How long should I run dehumidifiers after remediation? A: Keep them on until humidity remains stable below 50% and materials have equilibrated. In damp seasons, long-term dehumidification may be beneficial in basements and crawl spaces.
Q: What if I find mold in my HVAC? A: Turn off the system to avoid distributing spores and consult professionals with HVAC remediation experience. Proper cleaning and filtration are critical for safe operation.
Q: Are there New Jersey-specific regulations I should know? A: While general building and safety codes apply, local municipalities may have guidance on moisture control, contractor licensing, and disclosure. Check with local authorities when planning extensive work.
Ready to Protect Your Space
Whether you are tackling a small bathroom issue or coordinating a larger project after a storm, a clear, methodical process will protect your investment and health. If you want experienced guidance, scheduling, and verification to ensure the job is done right, connect with New Jersey professionals skilled in mold removal. Take control of moisture today, create a safer indoor environment, and keep your property resilient through every season.