
Introduction: Why an Inspection Checklist Matters in Bloomfield
Mold problems often start quietly in Bloomfield, New Jersey, where seasonal humidity, snowmelt, and aging infrastructure create persistent moisture challenges. An organized inspection checklist helps you find early warning signs, verify the scope of contamination, and plan effective cleanup. If you suspect growth—or if musty odors persist after rain—use a checklist to guide your evaluation and determine when to call in professional mold remediation support to eliminate contamination and stop it from returning.
A good checklist covers building exteriors, interiors, and mechanical systems. It identifies moisture sources, differentiates between porous and non-porous materials, and ensures you document findings with photos and moisture readings. With solid data, you can create a precise remediation plan and track progress from start to finish.
Part 1: Exterior Inspection Checklist
The exterior of your Bloomfield home influences interior moisture through drainage, infiltration, and ventilation. A methodical review can prevent water from entering in the first place.
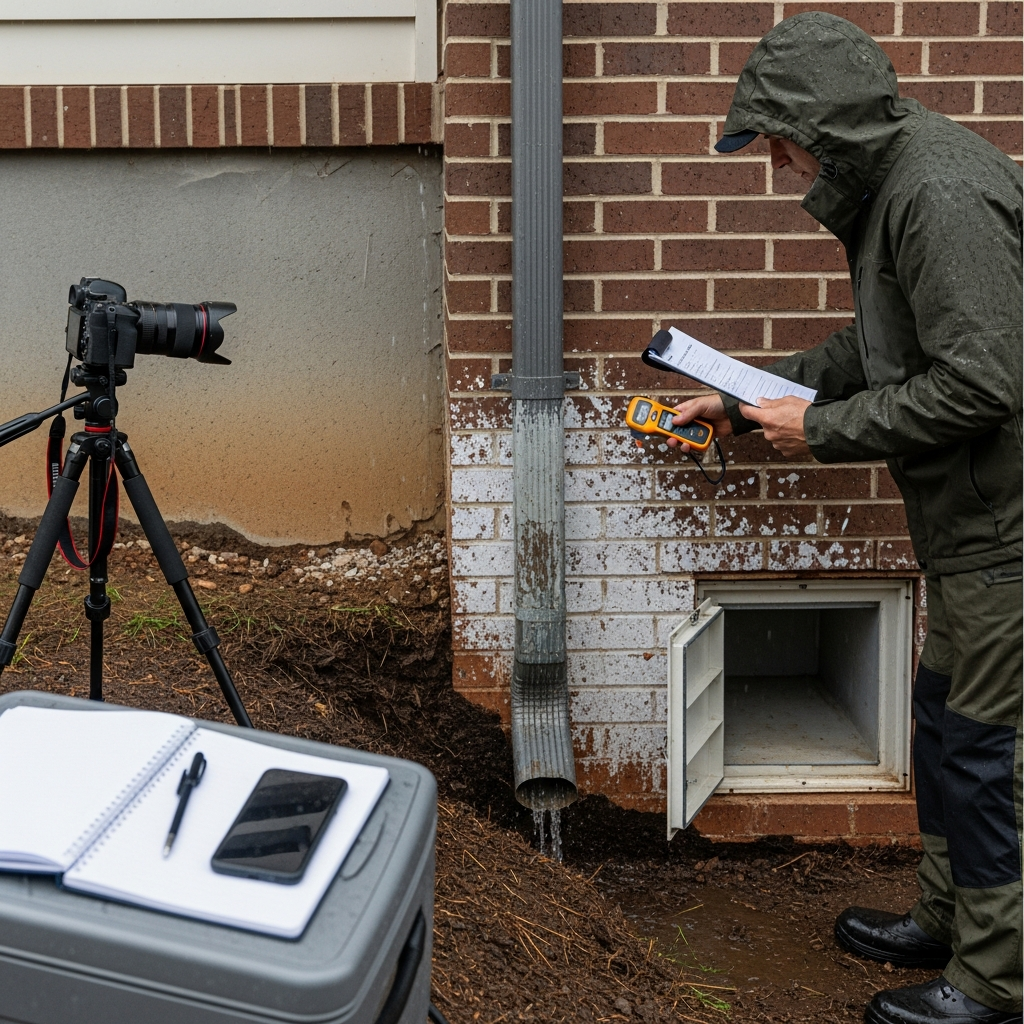
- Roof and Flashings: Look for missing or curled shingles, cracked caulk at flashings, and clogged valleys. Check around chimneys, skylights, and vent stacks for gaps.
- Gutters and Downspouts: Clear debris. Confirm downspouts discharge well away from the foundation and add extensions if water pools near walls.
- Siding and Sealants: Inspect for gaps, rot, or damaged trim where water or humid air could enter. Re-caulk where sealant has failed.
- Grading and Drainage: Ensure soil slopes away from the foundation. Watch for low spots that collect water during storms or snowmelt.
- Foundation and Masonry: Check for cracks or porous areas that allow seepage. Efflorescence and damp rings indicate chronic moisture.
Part 2: Interior Inspection Checklist
Inside the home, identify visible growth, musty odors, and water-damaged materials. Pay special attention to basements, bathrooms, kitchens, and laundry rooms—areas where water and humidity concentrate.
- Basement Walls and Floors: Look for staining, peeling paint, and damp corners. Test moisture levels at baseboards and sill plates.
- Finished Basements: Remove access panels and check behind wall systems if possible. Insulation can hide dampness and spores.
- Bathrooms and Kitchens: Examine under sinks, around dishwashers, and near exhaust vents. Condensation and slow leaks are common.
- Attics and Roof Decks: Check for dark staining on sheathing and signs of poor ventilation. Verify that bathroom fans vent outdoors, not into the attic.
- Windows and Doors: Inspect for condensation, warped frames, and mold at caulk lines.
- Flooring: Lift a corner of carpet in suspect areas. Look for pad discoloration or dampness.
Part 3: Mechanical and HVAC Checklist
Mechanical systems influence airflow, filtration, and moisture migration. A strong inspection includes a review of HVAC components and ventilation.
- HVAC Filters: Replace if dirty. High-efficiency filters help capture particulate once remediation is complete.
- Ductwork: Inspect accessible ducts for dust buildup and signs of moisture intrusion. Seal obvious gaps or leaks.
- Condensate Lines and Pans: Ensure condensate drains freely and pans are clean and dry.
- Ventilation: Confirm kitchen and bath fans exhaust outdoors and are adequately sized. In basements, consider ventilation strategies that avoid drawing humid air from outside during summer.
Part 4: Documentation and Testing Considerations
Document your inspection with clear photos, notes, and moisture readings. A log of humidity levels and leak events creates context for your remediation plan. While not always required, third-party testing can be used for clearance or when you need baseline data prior to demolition.
Part 5: Building a Remediation Plan from the Checklist
Once you have a detailed picture, convert your findings into an action plan. Prioritize areas with active leaks or high moisture content, and decide which rooms require containment. Determine which materials are salvageable and which must be removed. Build in time for drying and verification before restoration begins.
- Address Moisture First: Repair leaks, improve drainage, and stabilize humidity.
- Create Containment Zones: Prevent cross-contamination with barriers and negative air.
- Remove and Dispose: Take out saturated, contaminated porous materials.
- Clean and HEPA Vacuum: Detail all surfaces inside containment.
- Dry and Verify: Use dehumidifiers and confirm moisture levels are acceptable.
- Restore: Rebuild with moisture control in mind.
Bloomfield-Specific Clues to Watch For
In Bloomfield, older basements with masonry walls often show white powdery residue (efflorescence) that signals longstanding seepage. Tight attics can trap humidity, and bathroom fans may have been vented into attic spaces years ago, creating mold-friendly conditions on roof decking. Seasonal shifts—from winter freeze-thaw cycles to summer humidity—magnify small defects into persistent moisture pathways. Your checklist should account for these local realities.
When the Checklist Points to Hidden Mold
Sometimes, odors and minor stains suggest a bigger issue behind the surface. If your readings show high moisture in drywall, baseboards, or subflooring, or if insulation is damp, expect the remediation plan to include partial demolition. Removing baseboards, opening walls, and checking cavities often reveals the true scope. Clear communication and documentation help you make informed choices about removal versus repair.
Mid-Project Use of the Checklist
The checklist is not just for the beginning. Use it mid-project to confirm containment integrity, verify equipment placement, and track drying progress. Confirm that vents in the work zone are sealed and that negative air machines are running properly. Then, as demolition proceeds, expand your notes with photos to capture any newly discovered issues.
If you determine that a professional team is needed, align your inspection notes with a comprehensive plan for mold remediation. Share your photos, meter readings, and priority areas so the process moves quickly and efficiently.
Post-Remediation Checklist
After cleaning and drying, perform a final walkthrough with your documentation in hand.
- Visual Cleanliness: No dust, debris, or visible staining in the work area.
- Moisture Levels: Confirm readings are within target ranges for drywall, wood, and concrete.
- Air Management: Ensure negative air is removed only after the area is verified clean.
- Filter Changes: Replace HVAC filters and consider cleaning ducts serving the affected zone.
- Restoration Readiness: Surfaces are dry and prepared for rebuilding.
Long-Term Prevention Checklist
- Humidity Control: Maintain indoor RH between 30 and 50 percent.
- Routine Leak Checks: Inspect under sinks, around toilets, and near appliances monthly.
- Exterior Maintenance: Keep gutters clear and extend downspouts away from the foundation.
- Basement Monitoring: Use a dehumidifier during humid months and check for condensation behind stored items.
- Attic Ventilation: Confirm that vents and fans are unobstructed and properly routed to the outdoors.
FAQs
Do I need testing before remediation begins? Not always. If moisture and visible growth are present, many teams proceed directly to remediation. Testing may be used for documentation or when occupants are highly sensitive to allergens.
How often should I run through the checklist? Perform a full inspection seasonally and after major storms. Quick monthly checks under sinks and around appliances help catch problems early.
What if only one room smells musty? Odor in one area can still indicate hidden contamination or a nearby moisture source. Use the checklist to trace the pathway and test surrounding materials.
Can I keep using my HVAC during remediation? Vents within containment are typically sealed, and the system may be isolated from the work zone. After remediation, replace filters and, if needed, clean ducts.
How quickly should I act if I find moisture? Immediately. Faster response limits damage and reduces the scope of demolition.
Put Your Checklist to Work Today
With a thorough, well-documented inspection, you can move from uncertainty to clarity. Translate your findings into a targeted plan, confirm containment and drying milestones, and rebuild with moisture control at the forefront. If you need expert help implementing the plan, schedule professional mold remediation that aligns with your checklist and safeguards your Bloomfield home for years to come.