
Step-by-Step Mold Removal Process in Bloomfield, New Jersey
When you discover mold in your Bloomfield home, the right sequence of steps matters as much as what cleaner you choose. North Jersey’s climate, older basements, and lively attic ventilation challenges make a disciplined, methodical process essential. Use this walkthrough to safely tackle small, well-defined problems or to understand what a professional team will do for more complex projects.
From initial assessment to final verification, each stage builds on the last: stop moisture, contain, remove, clean, dry, and confirm. If you realize the situation is larger than expected or involves multiple rooms or HVAC, don’t hesitate to bring in experts. For rapid escalation and predictable outcomes, experienced mold removal process support is available to protect your home and family.
Step 1: Assessment and Moisture Control
Start with the why. Look for roof leaks, plumbing drips, foundation seepage, or condensation from unvented bathrooms. In Bloomfield, frequent culprits include clogged gutters, bath fans venting into attics, and window condensation during shoulder seasons. Address the source immediately—redirect downspouts, fix flashing, repair plumbing, and set dehumidifiers to 45–50% RH.
- Measure and document: Photograph affected areas, log moisture readings, and note odors.
- Map the footprint: Trace staining behind baseboards, in closets, and under windowsills.
- Decide scope: Small, localized patches are DIY candidates; larger areas call for professional support.
Step 2: Planning and Setup
Plan work zones, entry paths, and waste handling. Gather PPE, HEPA vacuum, cloths, sprayers, contractor bags, and plastic sheeting. Turn off HVAC serving the area and cover supply/return vents. Choose a window for exhausting air outside and protect floors with plastic or rosin paper.
- Communicate with household members about access and timing.
- Remove loose items from the work zone to reduce dust traps.
- Stage clean tools and supplies away from the affected area.
Step 3: Containment and Negative Pressure
Containment keeps spores and fragments from drifting into clean rooms. Tape plastic over doors with a slit entry, seal gaps around trim, and cover built-in shelves as needed. Set a box fan to gently exhaust air outdoors from inside containment, creating negative pressure. Check airflow with a tissue; it should draw inward at the doorway.
- Wear an N95 or respirator with P100 filters, gloves, and eye protection.
- Post a simple sign to keep others out.
- Bag debris inside containment before carrying it out.
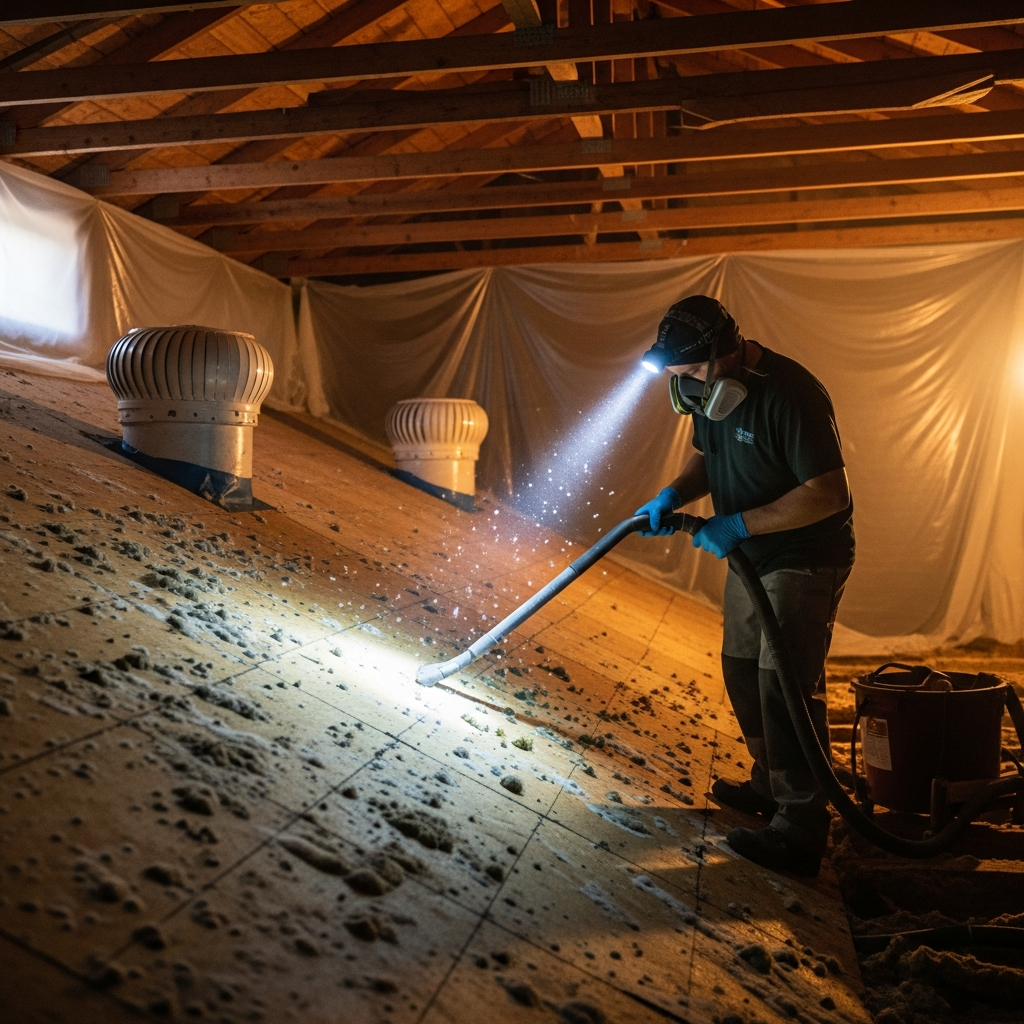
Step 4: Pre-Cleaning with HEPA Vacuum
Begin by HEPA vacuuming affected surfaces and adjacent areas such as baseboards, window sills, and floors. This reduces loose spores and dust so the wet cleaning you perform next is more effective and less likely to spread particles.
Step 5: Selective Removal of Porous Materials
Paper-faced drywall, carpet pad, and cellulose insulation that show visible colonization are typically removed. Cut drywall at least 12 inches beyond visible growth to reach clean paper and framing. Keep cuts straight for easier repair. Place debris directly into contractor bags and seal before exiting containment.
Step 6: Mechanical Cleaning of Durable Surfaces
For framing, subfloor, tile, and sealed concrete, use detergent and agitation with brushes or non-shedding cloths. Work in small sections, wiping in one direction and rotating to clean cloth faces frequently. Avoid blasting with high-pressure water or steam, which can drive moisture deeper into materials and slow drying.
Step 7: Rinse, Dry, and Detail Clean
Lightly rinse or wipe with clean water to remove residues. Deploy dehumidifiers and targeted airflow; aim for RH under 50%. After surfaces are dry, HEPA vacuum again to collect settled particles. If faint discoloration remains on sound wood, consider a restoration-grade primer or encapsulant after verifying uniform dryness.
Step 8: Address High-Risk Zones in Bloomfield Homes
Attics, basements, and bathrooms demand special attention. In attics, ensure bath fans vent outdoors, clear soffit and ridge vents, and air-seal ceiling penetrations around lights and pipes. In basements, maintain gutters and grading, add or service a sump system if present, and run a dehumidifier in summer. In bathrooms, upgrade to a quiet, efficient fan and use a timer so it runs after showers. For widespread or recurring issues, schedule professional mold removal to resolve hidden cavities and verify dryness across the entire zone.
Step 9: Verification Before Rebuild
Don’t cover up wet or dusty cavities. Verify moisture levels with a meter, compare with unaffected areas, and ensure odors are gone. Wipe white cloths across framing; they should come away clean. Only then proceed to insulation, drywall, and finishes.
Step 10: Rebuild with Moisture-Smart Details
- Use mold-resistant drywall in bathrooms and laundry rooms.
- Install proper backer boards for tile and fully waterproof wet walls.
- Seal penetrations with high-quality caulk or sealant.
- Add or upgrade bath fan timers and confirm airflow at exterior hoods.
- Maintain basement RH under 50% with dehumidification and routine filter changes.
Step 11: Post-Project Housekeeping
Even with careful containment, a fine layer of dust may settle outside the work zone. HEPA vacuum nearby rooms, wipe flat surfaces with damp microfiber, and replace HVAC filters. Keep humidity in range for several weeks while new finishes cure.
Common Mistakes to Avoid
- Cleaning without stopping the moisture source
- Skipping containment and spreading spores to clean rooms
- Over-wetting surfaces and delaying drying
- Painting over active growth instead of removing it
- Rebuilding before moisture levels return to normal
How Long Does the Process Take?
Timelines vary with scope and wetness. Small, single-room projects often follow a weekend rhythm: day one to set containment and remove contaminated materials, day two to dry and detail clean. Heavier water exposure or structural repairs extend schedules. Trust measurements over guesswork; materials should match moisture levels in unaffected parts of the home before you close up walls.
Frequently Asked Questions
Do I need air testing? Not necessarily. Visible growth and moisture problems call for targeted removal and drying. Verification can rely on visual cleanliness, absence of odors, and material moisture returning to baseline. Testing is project-specific.
What about bleach? Detergent-based cleaning and mechanical agitation on durable surfaces are often more appropriate. Bleach can add moisture and may not address porous materials. Focus on source removal and drying.
Can I save moldy insulation? Wet, colonized cellulose or fiberglass generally gets removed and replaced. Dry, uncontaminated insulation can remain after careful inspection.
Is negative pressure really necessary? For anything beyond a tiny patch, yes. Gentle negative pressure helps keep particles from migrating to clean rooms and hallways.
How do I prevent a repeat? Maintain gutters, vent bath fans outdoors, control humidity, and air-seal attic bypasses. Use timers on exhaust fans and keep RH under 50% in warm months.
What about HVAC contamination? If supply or return ducts run through the affected area, keep the system off during work, clean registers and nearby duct sections, and replace filters. Call professionals if growth is suspected inside ducts or air handlers.
Finish Strong and Keep Mold Away
A careful sequence—stop moisture, contain, remove, clean, dry, and verify—restores clean air and protects finishes. If your project expands beyond a simple patch or you want guaranteed containment and documentation, partner with reliable mold removal services that understand Bloomfield’s housing and climate.
With the right steps, your home will be drier, cleaner, and more resilient through New Jersey’s humid summers and stormy seasons.