
Mold Removal Inspection Near Bloomfield, New Jersey: What to Expect and How Long It Takes
If you live in Bloomfield and notice a stubborn musty odor, recurring wall stains, or condensation on windows, a mold removal inspection can clarify what’s happening behind the scenes. The goal is to locate moisture sources, define the true extent of growth, and map a plan that restores clean air without guesswork. This guide explains how inspections unfold in North Jersey homes, what inspectors look for, and how timelines typically progress from first call to final verification.
Every building is unique, and inspection findings can vary from a small bathroom patch to multi-room moisture concerns. When you’re ready for a thorough evaluation—especially in older homes with finished basements or tricky attic ventilation—consider bringing in trusted mold removal inspection support to ensure the right scope and sequence from day one.
Inspection Goals and Core Questions
A credible inspection answers three big questions: What is wet, how did it get wet, and how do we keep it dry? By the end, you should have a clear map of affected materials, a prioritized moisture-control plan, and a remediation sequence that fits your home’s layout and climate.
- Source identification: Roof, plumbing, foundation seepage, or condensation
- Extent of impact: Surfaces, cavities, contents, and HVAC implications
- Risk factors: Sensitive occupants, recurring leaks, or complex building details
- Verification path: Measurements and criteria for success
Step-by-Step Inspection Process
- Intake and history. Inspectors gather background: recent storms, past leaks, odors, or visible staining. Photos, receipts, and prior repairs help reveal patterns.
- Exterior survey. They check grading, downspouts, siding, windows, and roof details. In Bloomfield, clogged gutters and compromised flashing at dormers are frequent culprits.
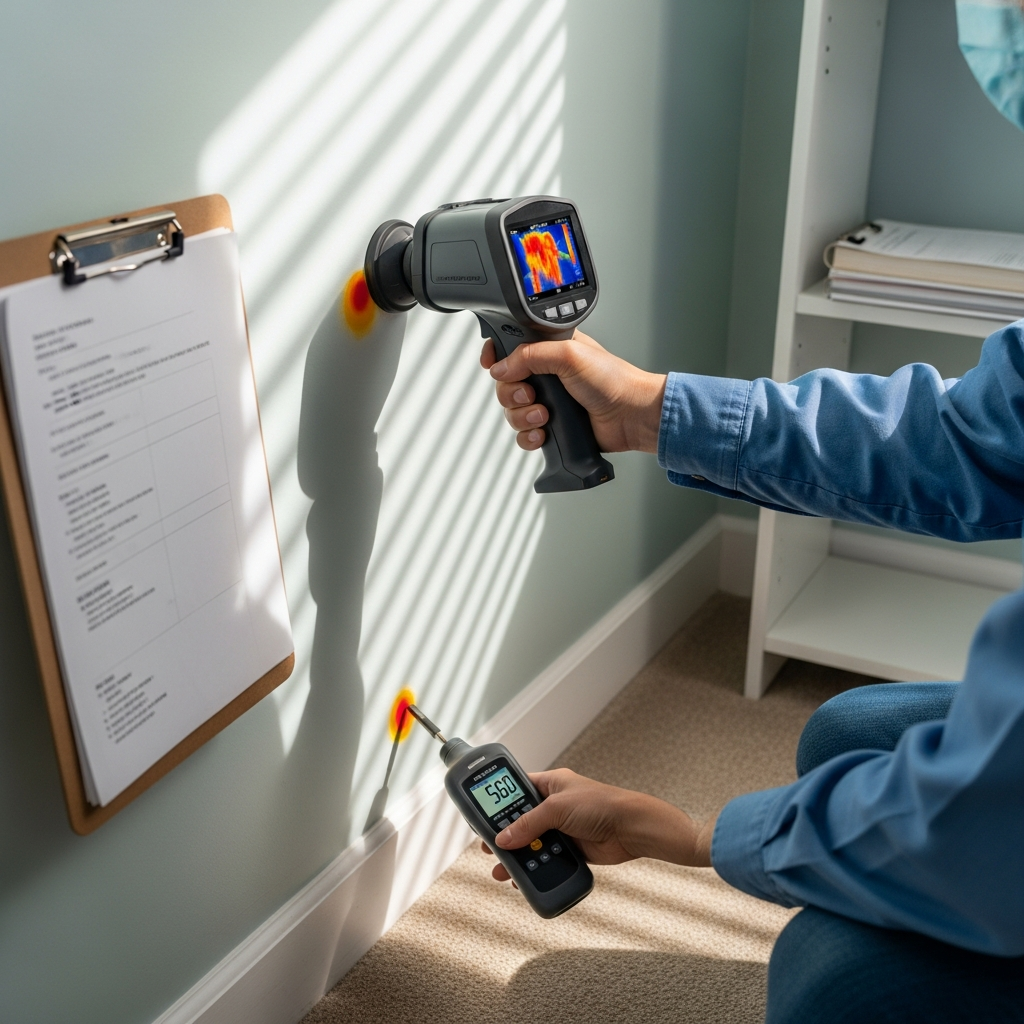
- Moisture screening. Using meters and thermal cameras, inspectors compare suspect areas to known-dry references. Thermal imaging highlights cool, damp spots behind finishes.
- Interior walkthrough. Rooms, closets, and mechanical spaces are examined. Window sills, baseboards, and cold corners often reveal early clues.
- Attic and basement focus. These zones dominate local problems: attic condensation from bath fans venting inside; basement humidity or foundation seepage after thunderstorms.
- Documentation. Findings are captured with photos, moisture data, and a floor-by-floor map of affected materials.
- Plan development. The inspector outlines containment needs, removal areas, cleaning methods, and drying strategy, along with preventive upgrades.
Non-Destructive Tools and Limited Probes
Inspectors use pin and pinless moisture meters, hygrometers, and sometimes thermal cameras for non-destructive insights. If needed, small test cuts or baseboard lifts confirm what’s happening inside wall cavities. Limited sampling may be considered in complex cases, but visible growth and moisture readings often provide sufficient direction.
Timeline: From First Call to Clearance
Although each project differs, a common rhythm emerges.
- Initial contact and scheduling: A quick phone consultation to triage urgency and schedule a site visit.
- On-site inspection: Typically a focused appointment to document sources, extent, and priorities.
- Written plan: A clear, stepwise outline describing containment, removal, cleaning, and drying, plus preventive measures tailored to Bloomfield’s climate.
- Remediation phase: Implementation following the plan—containment, source control, selective removal, cleaning, drying, and verification.
- Verification and re-occupancy: Moisture returns to baseline, odors dissipate, and areas are ready for rebuild if needed.
What Inspectors Look for in Bloomfield Homes
Local homes often feature finished basements, older windows, and attic spaces with inadequate ventilation. Inspectors pay special attention to these patterns:
- Gutters and downspouts that overflow at eaves, wetting siding and sill plates
- Bathroom fans that terminate in attics, causing roof sheathing condensation
- Foundation hairline cracks and cold-wall condensation behind furniture
- HVAC condensate line clogs near laundry or utility rooms
- Window and door flashing failures during wind-driven rain
What a Good Inspection Report Includes
Expect a concise, readable document that sets you up for action rather than confusion. It should include photos, moisture maps, a prioritized task list, and criteria for success. Look for practical guidance you can actually follow, with clear steps for both immediate stabilization and long-term prevention.
- Summary of findings with moisture sources and affected materials
- Containment and safety recommendations
- Selective removal and cleaning instructions by room or assembly
- Drying targets: relative humidity and material moisture benchmarks
- Preventive upgrades such as ventilation fixes and drainage improvements
- Verification plan for post-remediation cleanliness and dryness
When an Inspection Triggers Immediate Action
Some findings call for same-day stabilization: shutting off a leaking line, tarping a roof penetration, or installing a temporary dehumidifier. In Bloomfield’s humid months, delaying can raise indoor RH fast enough to spread the footprint of damage. Quick action limits scope and simplifies the path to a clean, dry home.
DIY vs. Professional Remediation After Inspection
Inspections often reveal whether DIY is sensible. Small, well-defined areas with straightforward moisture sources are candidates for homeowner cleanup. Larger footprints, multiple rooms, or HVAC involvement tend to require professional containment and negative pressure. If your report recommends escalation, prioritize teams that deliver documented containment, HEPA filtration, selective removal, and measurable drying targets.
Frequently Asked Questions
Do I always need an inspection first? If you see a tiny, isolated patch and you know the source (e.g., a just-fixed leak), you may proceed with careful DIY removal. Inspections add value when the source is unclear, when multiple areas are affected, or when documentation is important for coordination.
Will there be holes in my walls? Most inspections are non-destructive. Limited test cuts occur only when necessary to confirm hidden moisture or growth, and they are planned to simplify later repairs.
What about air testing? Many projects rely on visual and moisture-based findings. Air or surface sampling may be considered in special cases, but action is usually driven by evidence of moisture and visible contamination.
How long does the whole process take? The inspection itself is typically a focused visit, followed by a written plan. Remediation time depends on scope and drying needs. Verification happens once moisture and cleanliness targets are met.
How can I prepare for the inspection? Clear access to sinks, vanities, and mechanical rooms; gather any prior repair records; and note when odors are strongest (after showers, during storms, or in summer evenings).
What about contents and furniture? Inspectors may suggest temporarily moving porous items away from exterior walls or damp corners and evaluating them for cleaning or disposal during remediation.
Do inspectors coordinate with contractors? Yes. A good inspection lays out a sequence that contractors can implement efficiently, from containment to drying to verification, minimizing disruption in your home.
Prevention Roadmap After Inspection
Use your inspection as a springboard for lasting improvements. Bloomfield’s seasons challenge homes in different ways; plan upgrades accordingly.
- Spring: Clean gutters, check grading, and test sump pumps if present.
- Summer: Maintain 40–50% RH with dehumidification; verify A/C condensate drains are clear.
- Fall: Inspect roof flashing and seal gaps around penetrations.
- Winter: Improve attic insulation and ventilation to prevent condensation and ice-dam leaks.
From Findings to a Healthier Home
A mold removal inspection is more than a checklist—it’s a roadmap to durability and clean air. By pinpointing sources, setting clear drying targets, and defining success, you shorten the path from discovery to resolution and reduce the chances of a repeat.
When you want clarity, speed, and building-specific advice, work with dependable professional mold removal partners who know Bloomfield’s housing stock and weather patterns and can move from inspection to remediation without delay.
Take the Next Step with Confidence
The sooner you understand the moisture story in your home, the sooner you can stop damage, restore clean air, and move forward. Start with a methodical inspection, then follow a measured plan for containment, removal, cleaning, and drying. If you prefer experienced hands and guaranteed containment, reach out to trusted mold removal services that can turn findings into lasting results for your Bloomfield home.
With the right information and a clear sequence, you can navigate inspection and remediation calmly and effectively—season after season.